ATS Two Day Crash Course
This document references Rapid Reserver 1 for reserves generation.
For Rapid Reserver 2 instructions, see the /wiki/spaces/RR2D/pages/28443086.
This is a step by step guide to deliver a plan in 48 hours with no prior training or knowledge of Alastri products.
It is deliberately light on theory and narrow in focus. For general information about ATS, read the full documentation.
Contents
Prerequisites
In order to deliver a plan you will require:
- Working laptop that meets the system requirements.
- Login credentials to the licensing server.
- An installation of the Alastri Hub.
- A copy of the project files from last week's / last month's plan.
- MyTacticalFile.tsch
- MyTacticalFile.hinf
- MyTacticalScripts (folder)
- PitBlocks.rr
- DumpBlocks.rr
- MyBlockModel.bintab
Copy the files to a working folder on your local machine. Do not work across the network unless you have to.
Rapid Reserver
If Rapid Reserver is not installed, open the Hub and install the latest version.
Double click on your PitBlocks.rr to open the project.
Block Model File
Block model files must be run from the local drive. Do not access block models across a network connection as it will affect performance.
- Go to the Block Models tab.
- Locate the block model link in the top of the form.
- If the link is broken, navigate to the file.bintab and refresh the data.
- Check the block model name and version number.
- If the block model is out of date,
- Dump the latest /wiki/spaces/CTP/pages/26673200
- Import the /wiki/spaces/RRD/pages/28311779.
To confirm that a block model is loading correctly, observe:
- A loading bar and/or counter is updating in the bottom right of the form.
- Any errors are displayed as red exclamation marks in the bottom left of the form. Click the error to read the full error message.
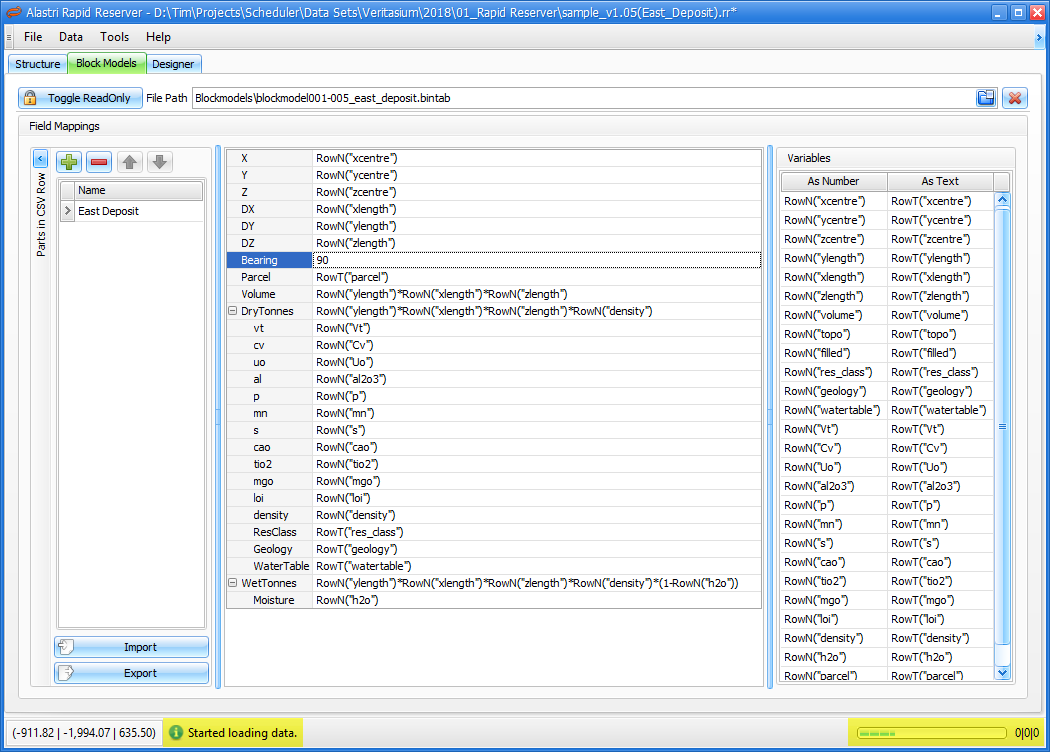
Block Model Mappings
If the business has for some reason changed the block model field names (from MaterialClasses1 to MaterialClasses2, for example) then you will need to update the mapping.
- While loading the block model, check for red exclamation marks in the bottom left of the Block Models tab.
- Click on the error text to see the full error message, such as "The mapping for Parcel cannot be resolved to text."
- Check the Variables list on the right of the form for the correct field name to use.
- Drag and drop the correct field name into the associated mapping.
Continue this process until the block model loads without errors.
Update Pit Solids
Rapid Reserver pit solids are defined by the volume between pit design(s) and topography. To update scheduling blocks, we need to cut by the latest topography.
For each phase in the project:
- Go to the Designer tab.
- Go to the Phases panel.
- Click on the current phase.
- Click the (...) ellipsis button to configure the phase.
- Go to the Phase Constraints panel.
- Click the green plus button to select or import the latest topography.
- Delete the old topography
- Set the new topography Constraint Type to 'Top And Not Above'.
- Wait for the phase to recalculate.
- Press OK to finish.
Repeat for every phase in the project.
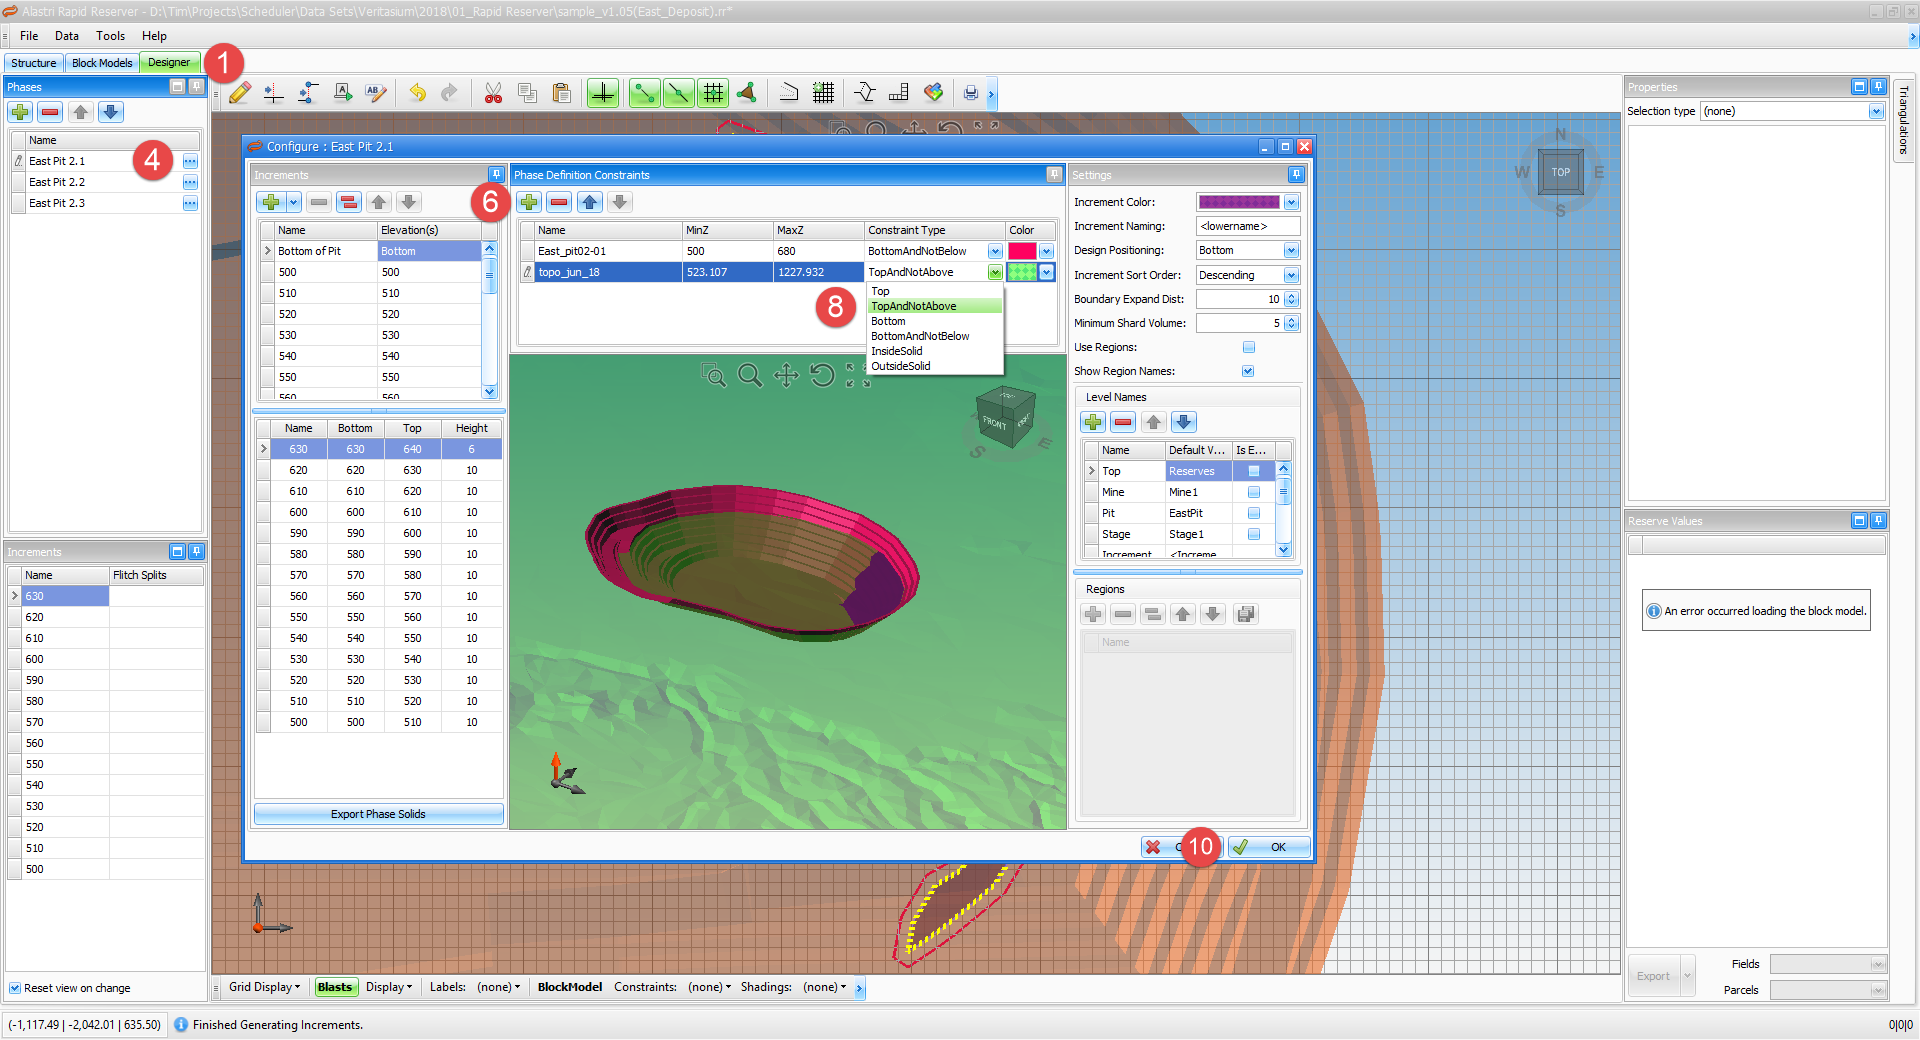
If pit designs have changed, follow the same steps replacing the old pit design with the new pit design, and using Constraint Type 'Bottom And Not Below'.
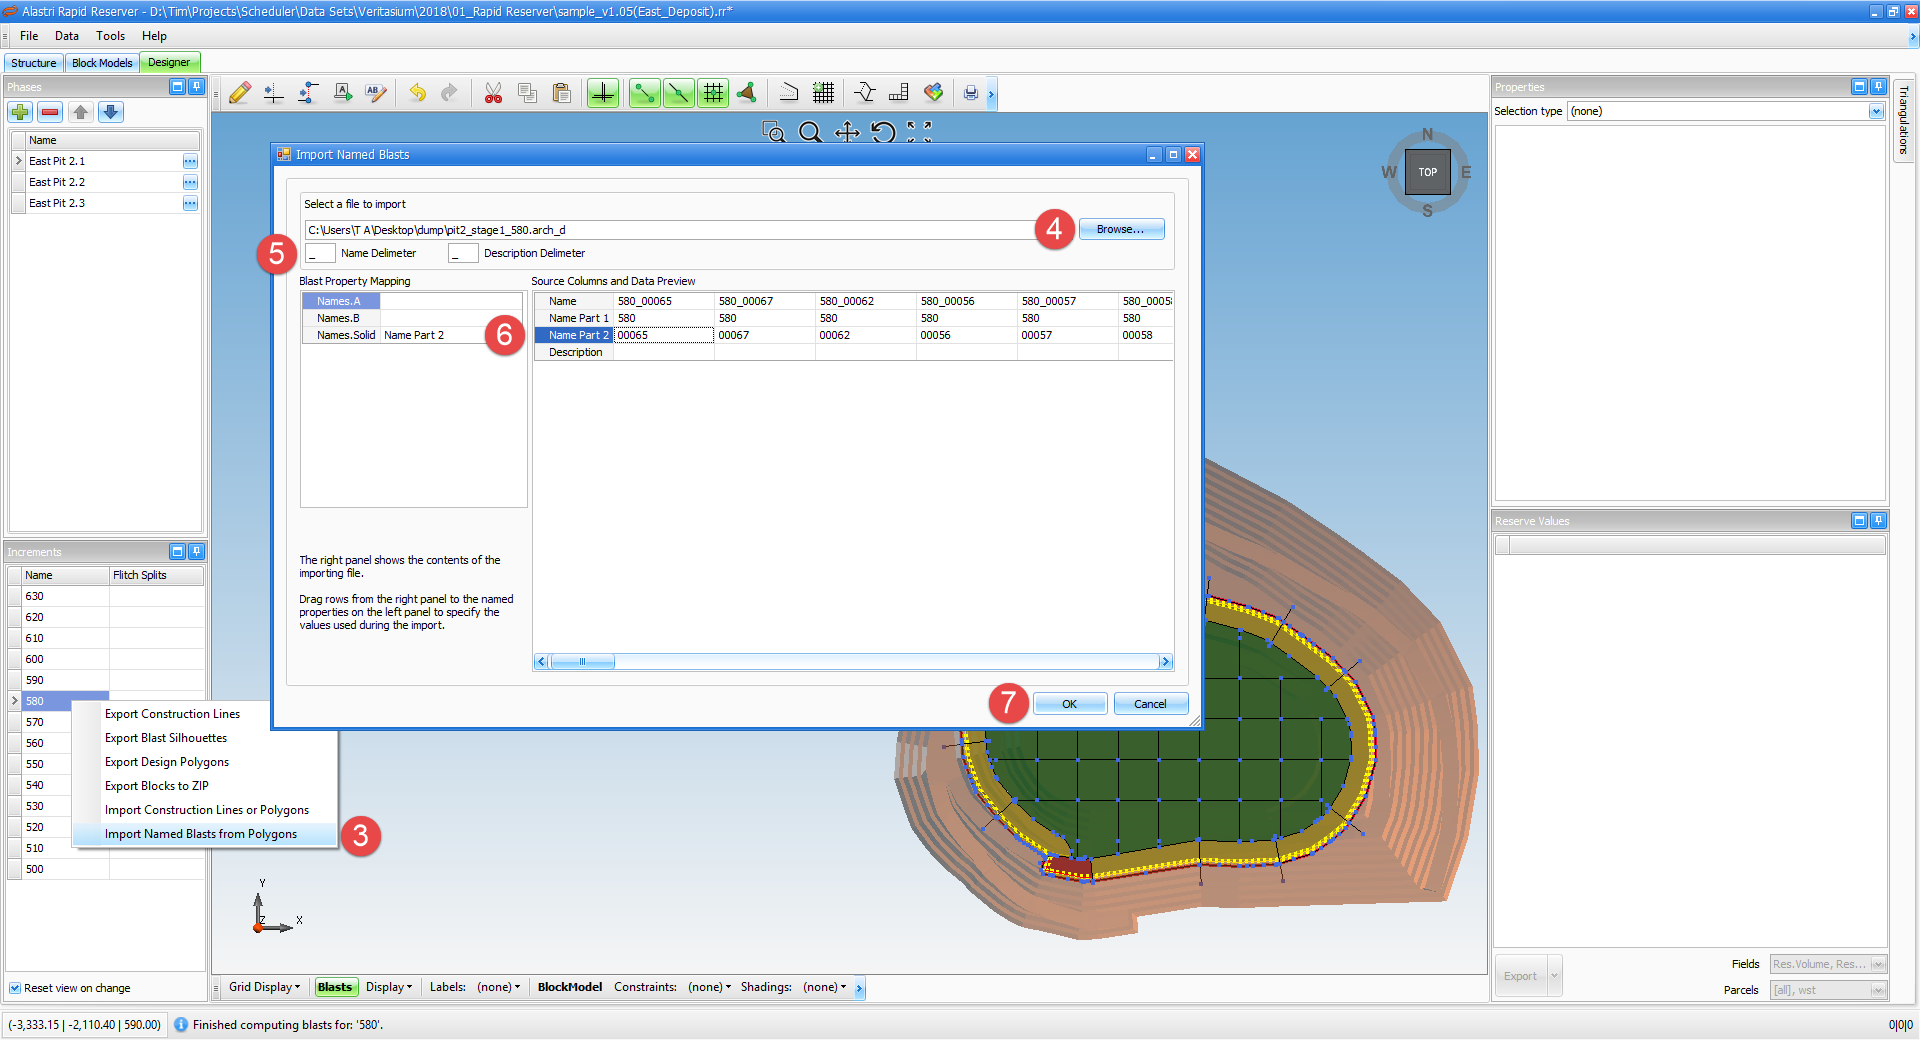
Update Blast Masters
Get the latest blast master files:
- Open up Vulcan/Surpac/Deswik and navigate to the latest blast masters.
- Export each bench as an individual file in file.arch_d format. (Only export benches that have changed since the last planning cycle, and which you are planning to schedule).
For each phase in Rapid Reserver:
- Go to the Increments panel and select a bench.
- Drag a selection box over all strings and press the Delete key to remove them.
- Right click on the Increment number (ie. 580 RL) and select 'Import Named Blasts from Polygons'.
- Click 'Browse' to find and import the benchplan.arch_d
- Enter delimeters (usually underscores) to break up the Name and Description fields.
- Drag and drop the fields into the appropriate block properties.
- If you are using A and B levels, these usually represent the Blast Name (A) and Grade Control Code (B)
- Otherwise, Names.Solid is fine.
- Press OK to finish.
Repeat for every bench that needs updating.
Note that any unsnapped points in the blast master may result in wedge solids due to gaps or overlaps in construction lines. These can be rectified by dragging the points or editing the lines.
To discard a block from the reserves, click on the block and change the 'Include Solid' property to false in the Properties panel.
Import Grade Control
Grade control blocks are imported over the top of the block model data.
Go to Data > Import > Grade Control Database and step through the import wizard.
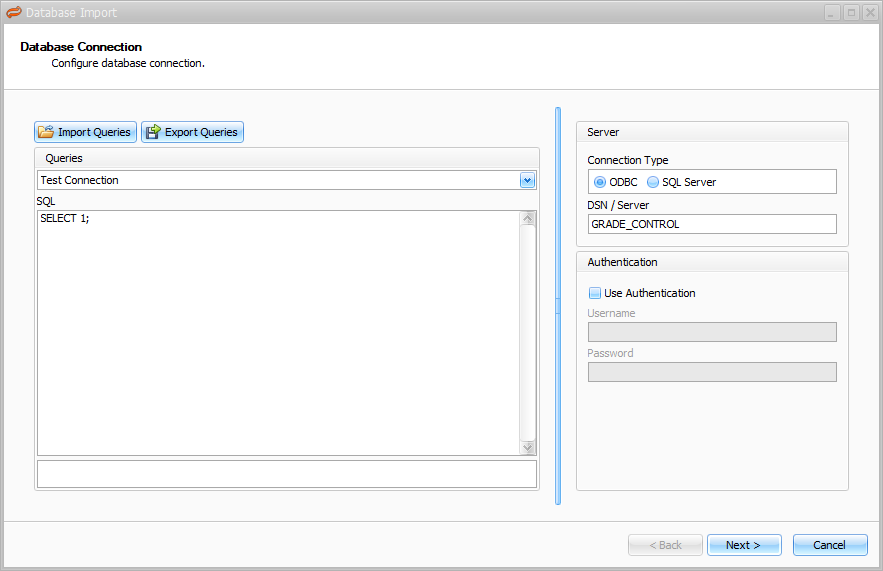
Enter database credentials and connect to the database.
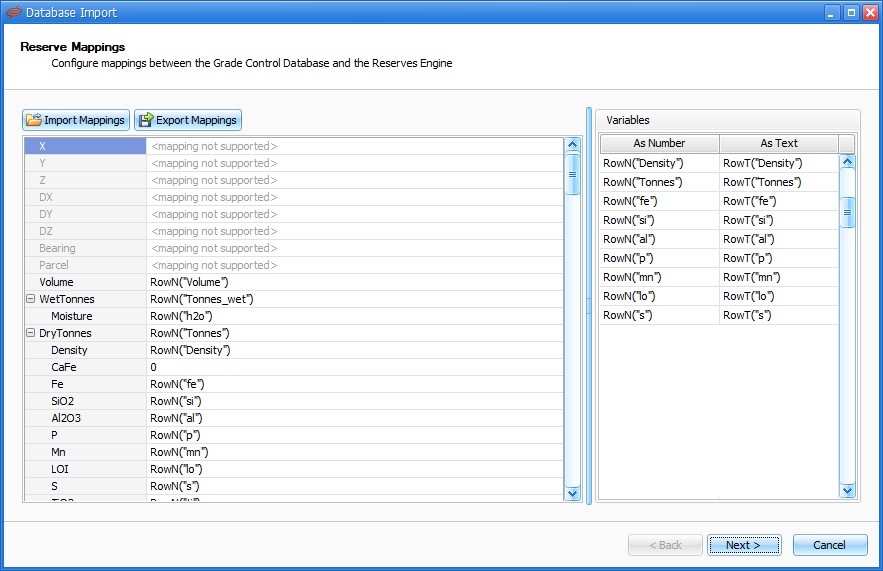
Map the database fields into the reserves.
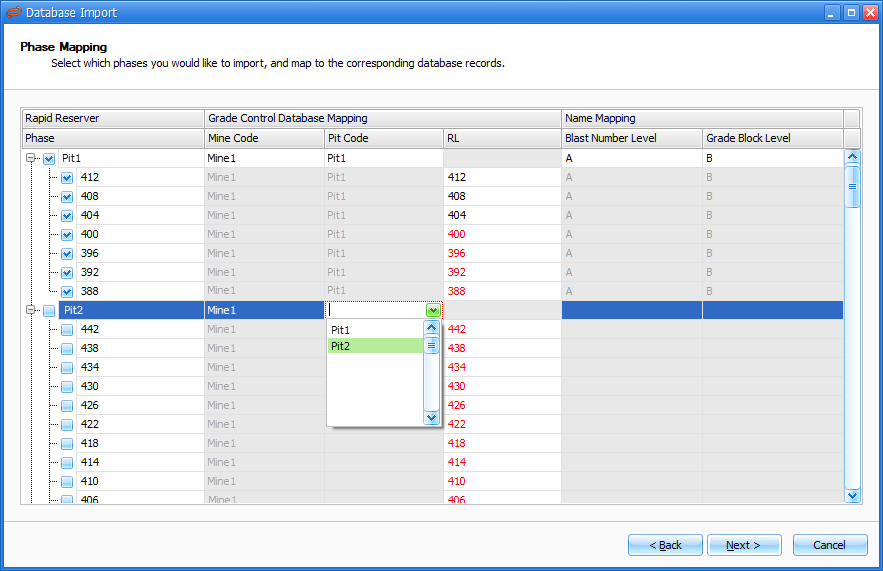
Map the database levels into the phases.
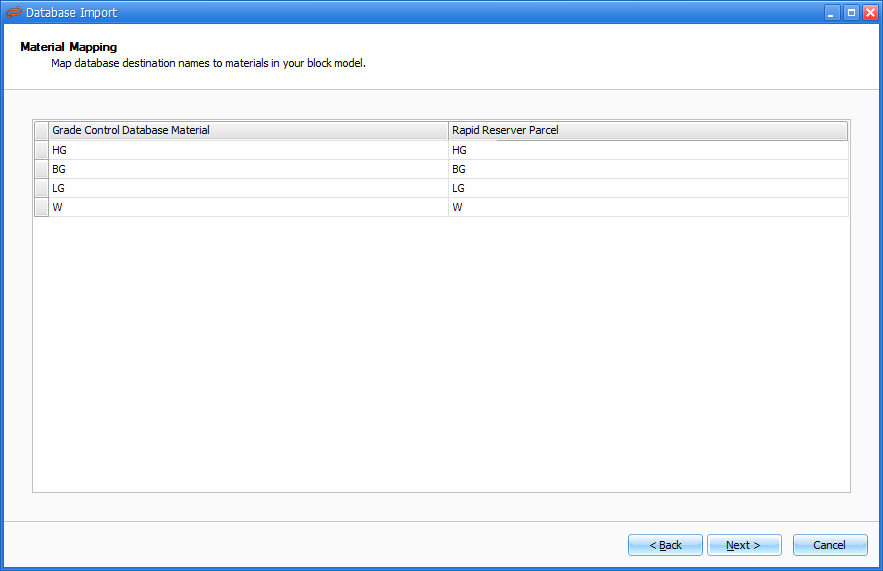
Map the database material types into the parcels.
Inspect the imported blocks and exclude any obsolete data.
Grade control blocks are displayed with a hatching pattern, and have the 'ReservesDataSource' property set to 'GradeControl'.
Export Blocks
Before export, click a single block in each phase and check:
- In the Phases panel, is each phase correctly named?
- In the Properties panel, do the Level Names match the current pit address?
- In the Reserves panel, are all material types present and accounted for?
- In the Reserves panel, are all block model fields reading realistic values?
- Are any benches missing construction lines?
- Are all blocks uniquely named? (Names.Solid is guaranteed unique, other levels are not).
To export the blocks to zip:
- Data > Export > Blocks to Zip.
- In 'Choose Files', set the save file path to your WorkingFolder/Reserves
- In 'Select Increments', tick all pits/benches to be used in scheduling. (Short term planners might only be interested in the top 2-3 benches of a given pit).
- In 'Select Export Levels', leave all phases as 'Solid'.
- In 'Configure Export', leave all options as default.
- Press the save icon to finish.
Tactical Scheduler
If Tactical Scheduler is not installed, open the Hub and install the latest version.
Double click on your MyTacticalFile.tsch to open the project.
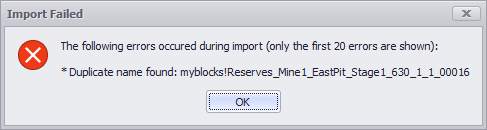
Import Blocks
- Go to Setup > Choose Files.
- Click the 'Re-Import' button next to each import file and select the new blocks.zip files.
- Press 'Run Next' in the top left to continue.
An 'Import Failed' message will be displayed if a blocks.zip contains duplicate files. To resolve this error, go back to Rapid Reserver and make sure that each phase is uniquely named.
 Preschedule
Block Model blocks refer to solids that have been reserved against a block model.
Grade Control blocks refer to solids that have been reserved from a grade control database. By default, Grade Control blocks are not cut by topo in Rapid Reserver.
Use the Preschedule tab to inspect the scheduling inventory for rubbish data. If you have properly updated the topographies in Rapid Reserver, then no Block Model blocks should project above the topo.
Grade Control blocks can be prescheduled using the Auto Preschedule function.
- In the Layers panel, hit the blue plus button and import the latest topography.
- Above the viewport, press the lightning icon

- In the preschedule dialog, select the topography from the dropdown selector.
- Tick 'Remove Fully Prescheduled Blocks'.
- Tick the pits to be prescheduled.
- Press OK.
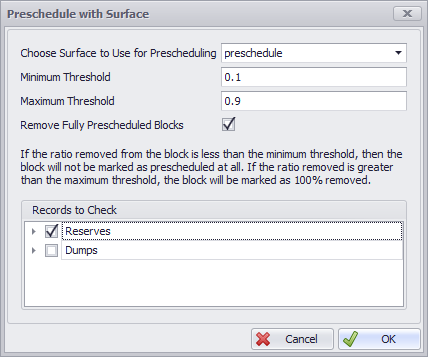 Blocks are colour-coded by the percentage of remaining material.
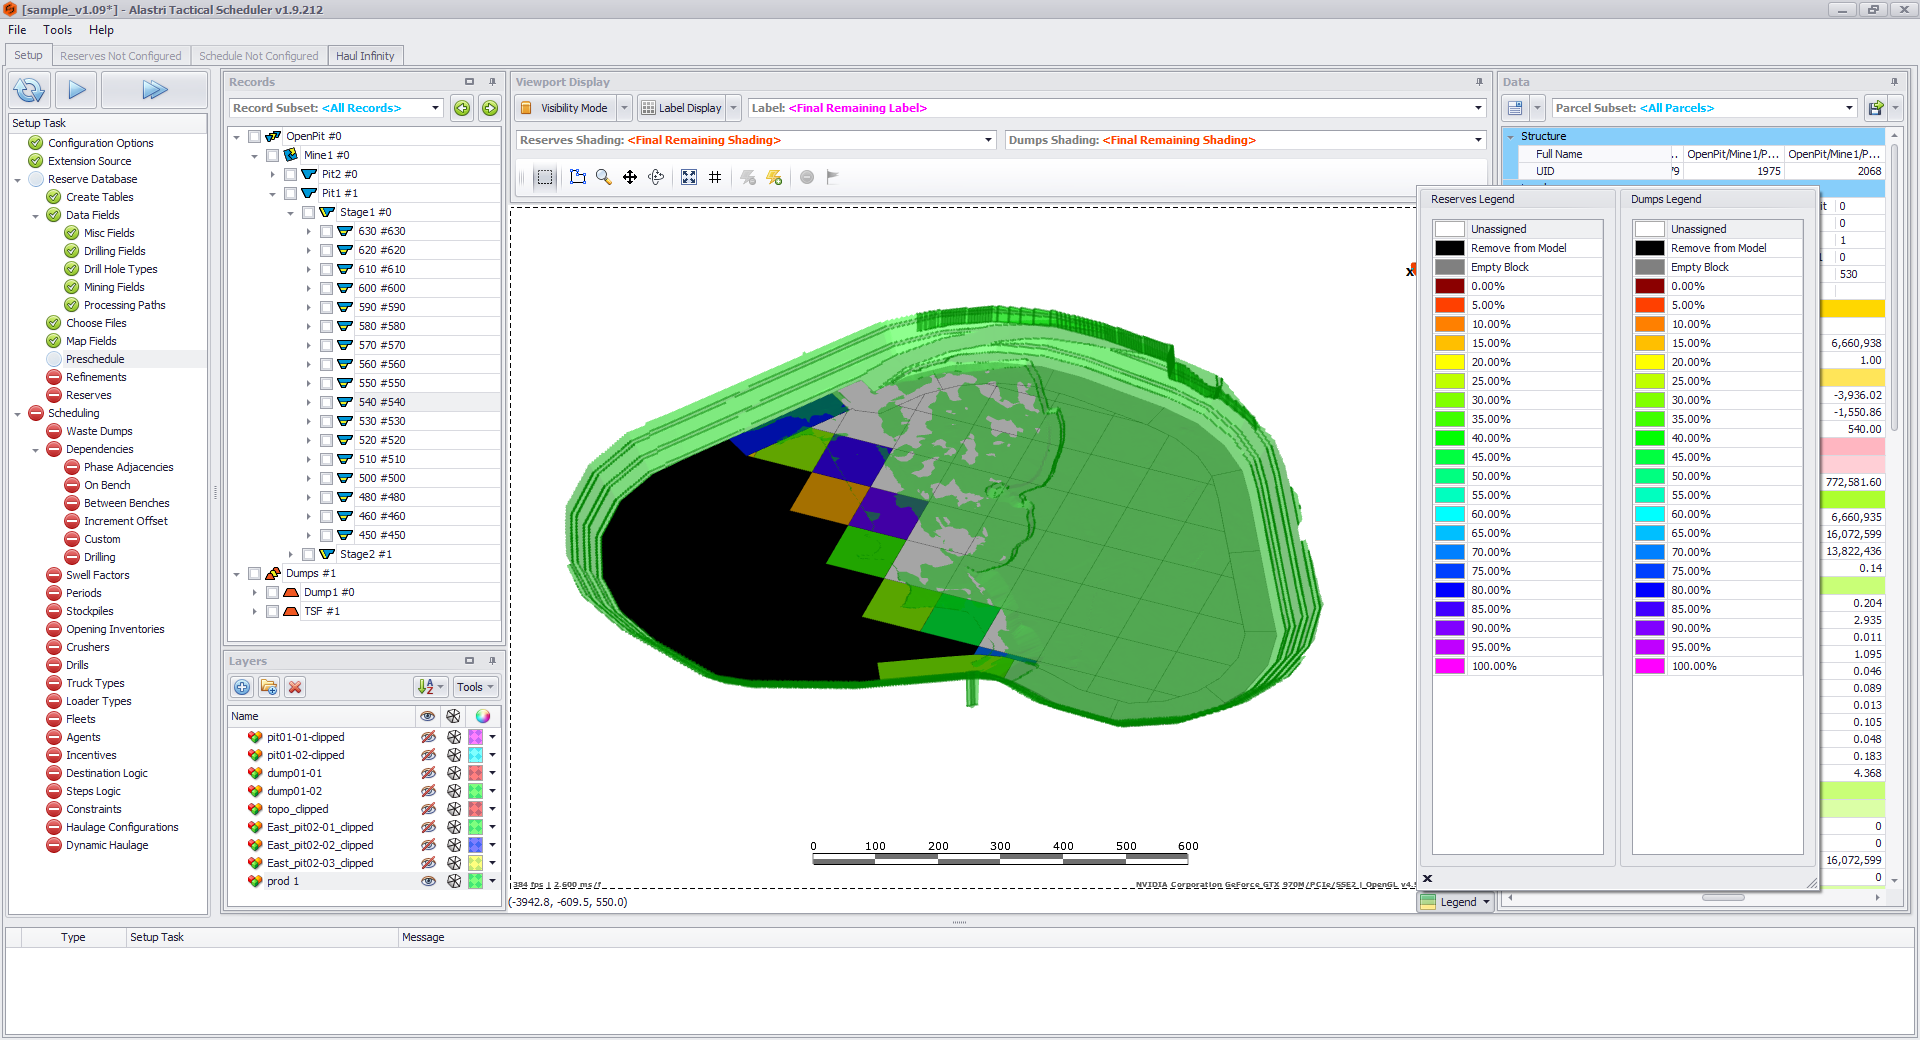
After the Auto Preschedule, toggle "Visibility Mode" above the viewport and use the Records panel to inspect every bench. Often a block will technically have material remaining (because the wall hasn't been dug back to design) even though it is not mineable. If a block is not reasonably accessible by an excavator, it should be removed from the scheduling inventory.
Refinements
Refinements are used to apply call factors to product recovery and grades. Check with your supervisor whether these numbers need updating, or whether to run with the same values as the last plan.
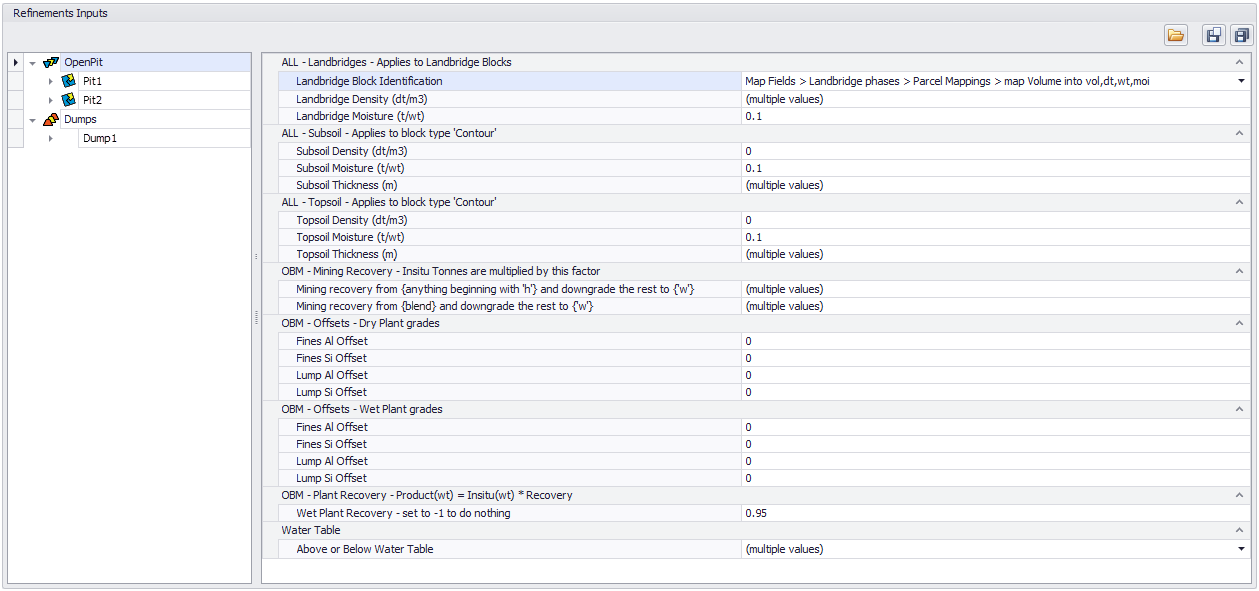
Example Refinements table.
As a general rule, the refinements should be self-documenting. If you have any doubt at all about what a section is doing, contact your license administrator to log an improvement request.
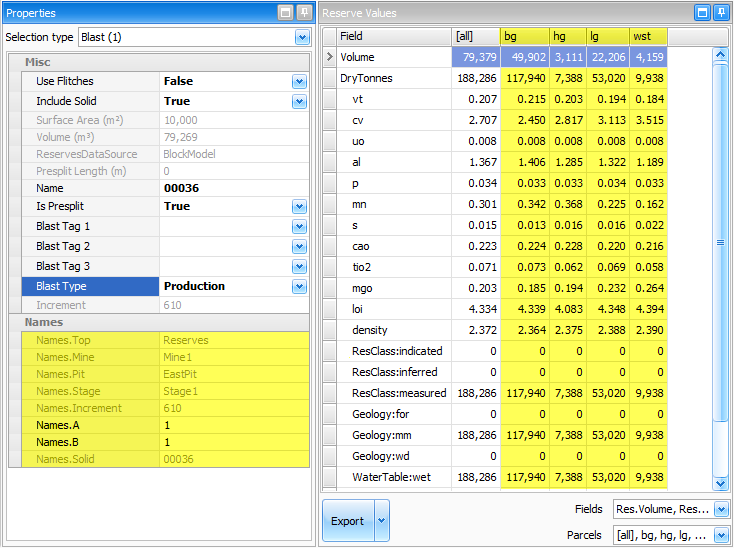
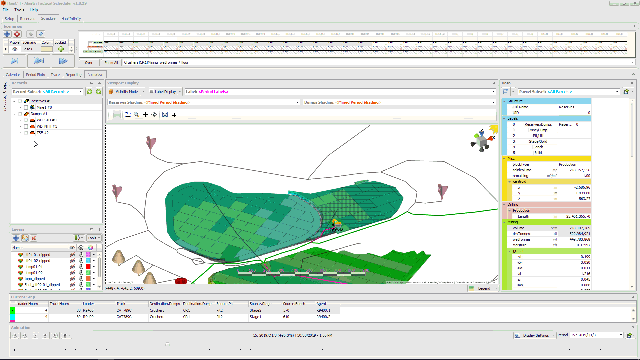
Reserves
Before continuing with the setup, go to the Reserves tab and check for errors.
- Toggle 'Visibility Mode' above the viewport.
- Change the 'Reserves Shading' to 'Level_Stage_Name' above the viewport.
- Double-click a pit in the Records panel to centre it.
- Right click and rotate the pit to inspect for geometry errors.
- Does any stage overlap with another stage?
- Are there any missing benches?
- Is any bench lacking a blast master?
- Are there any preschedule blocks floating in the air?
- Select some blocks and inspect for reserving errors in the Data panel.
- Are all material types present?
- Are any values zero that should not be zero?
- Are any values negative that should not be negative?
- Are any values NaN ("Not a Number")?
- Select a block and compare the Data panel between the Preschedule step and the Reserves tab.
- Are the Refinements inputs doing what they purport to be doing?
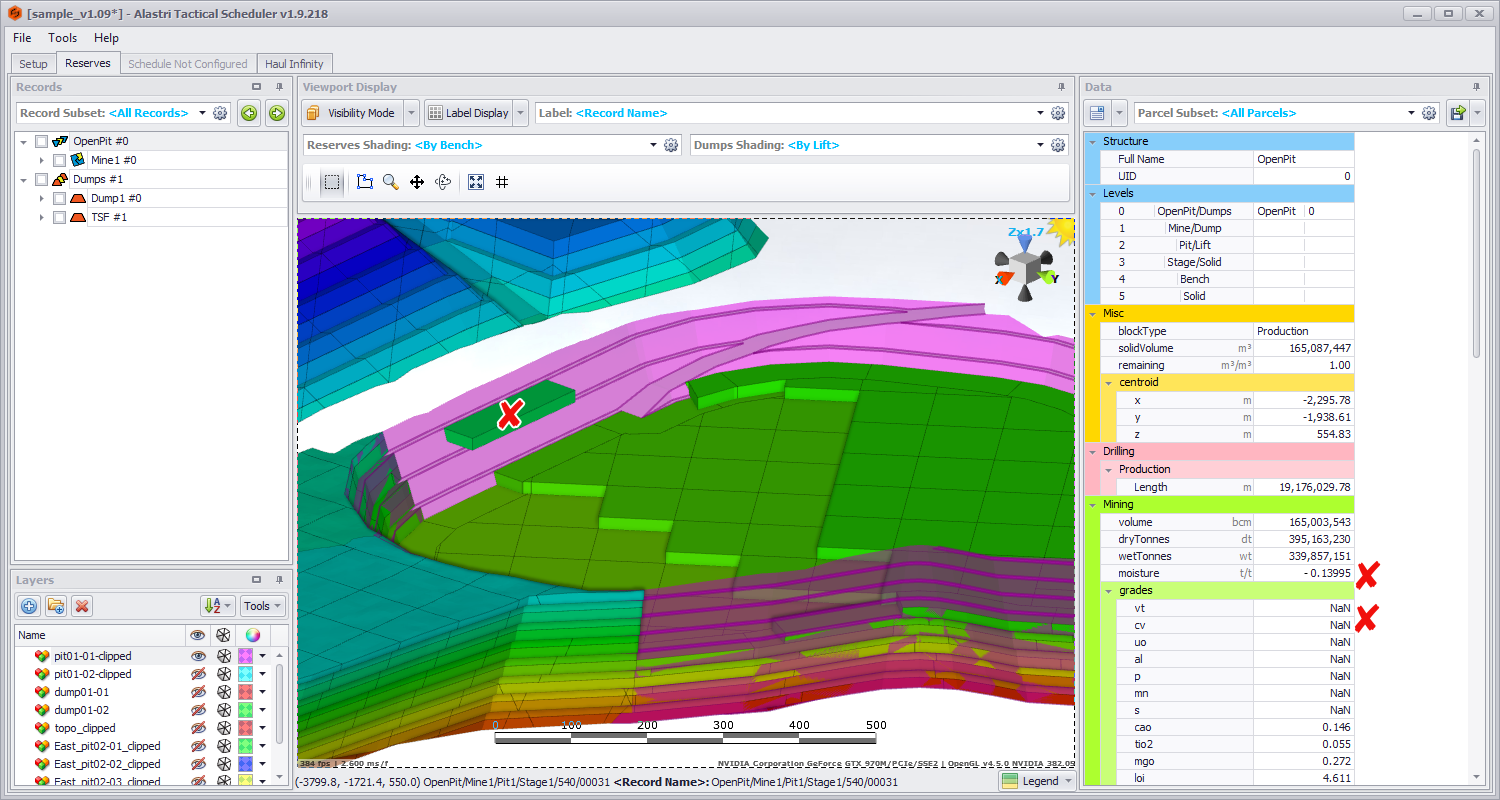
Errors in this screenshot: (1) Floating preschedule block, (2) Negative moisture, (3) NaN grades.
On finding any geometry issues, make corrections in Rapid Reserver and re-import the blocks.
If any reserves errors are present in the Preschedule tab, then the issue is in Rapid Reserver.
- Check the block model formulas are correct.
- Check the block model native values are correct.
If reserves errors are not in the Preschedule tab, then they were introduced by the Refinements.
- Check the Refinements inputs are correct and up to date.
- Contact support@alastri.com.au for assistance.
Parcel Subsets
Go to the Reserves tab > Data panel > gear icon  > Parcel Subsets dialog.
- Parcel subsets: contains a list of parcels in any given category.
- Mutex parcel subsets: contains a list of categories, and each parcel appears in exactly one category.
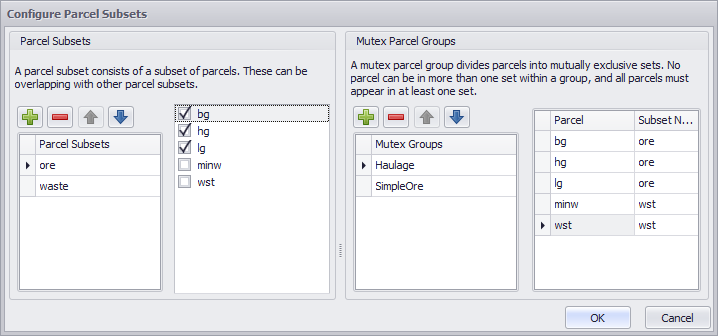
Scheduling rules and reports can be greatly simplified by referencing parcel subsets.
It is not uncommon for new parcels to appear if the block model has undergone recent changes. If this is the case, you will see that the parcel has a value of 'Unassigned' in the Mutex Groups.
With 'Unassigned' parcels:
- Map the new parcel into the appropriate category in each Mutex subset.
- Tick the parcel in the appropriate parcel subsets, where it belongs.
Destination Logic is usually set up as 'All <Ore> goes to <Crusher>'. Failure to tick a parcel as ore may result in it being stockpiled instead of feeding.
Report templates are usually set up as 'Report all <RockType> by <Period>'. Failure to assign a parcel to the right mutex category may result in incorrect reporting.
Schedule Logic Introduction
Keep these relationships in mind when making changes to the schedule logic and calendar values.
| Item | Description |
|---|---|
| Agent | Pick the blocks and executes schedule logic upon them. |
| Dependencies | Only some blocks are available to mine at each moment. |
| Incentives | With the available blocks, prefer to mine some over others. |
| Destination Logic | With the selected block, find a destination. |
| Steps Logic | With the selected source and destination,
|
| Fleets | With each selected fleet, find a truck and loader combination with remaining hours. |
| Loader Types | With the selected loader, consume loader hours at the loader production rate. |
| Truck Types | With the selected truck, consume truck hours at the truck production rate. |
Once the sum of movement between a source and destination hits a Constraint, then no more material may be moved between those points.
In Optimised Products mode, once all constraints have been hit, the Product Specifications are used to recalculate the ore destinations for optimum crusher feed.
Phase Adjacencies
Phase Adjacencies prevent a block being mined underground relative to a neighboring cutback. Note that the schedule can still mine the two stages concurrently, it just prevents underground mining relative to each other.
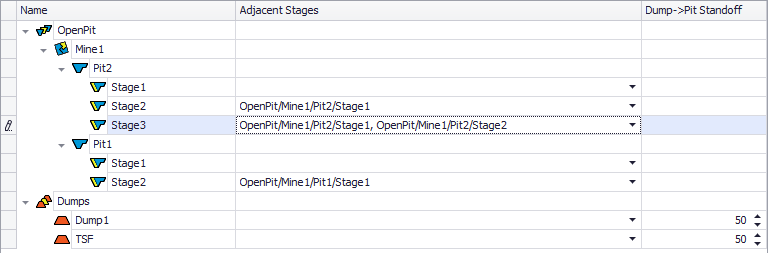
When mining a block in Stage3/500, check that the polygon boundary does not overlap with any block in Stage1/510 or Stage2/510
If your data has any stages that significantly undercut another stage, make sure the upper stage is referenced as an 'Adjacent Stage' to the lower stage.
On Bench Dependencies
On Bench dependencies prevent blocks at the back of the bench being mined until blocks at the front have been taken.
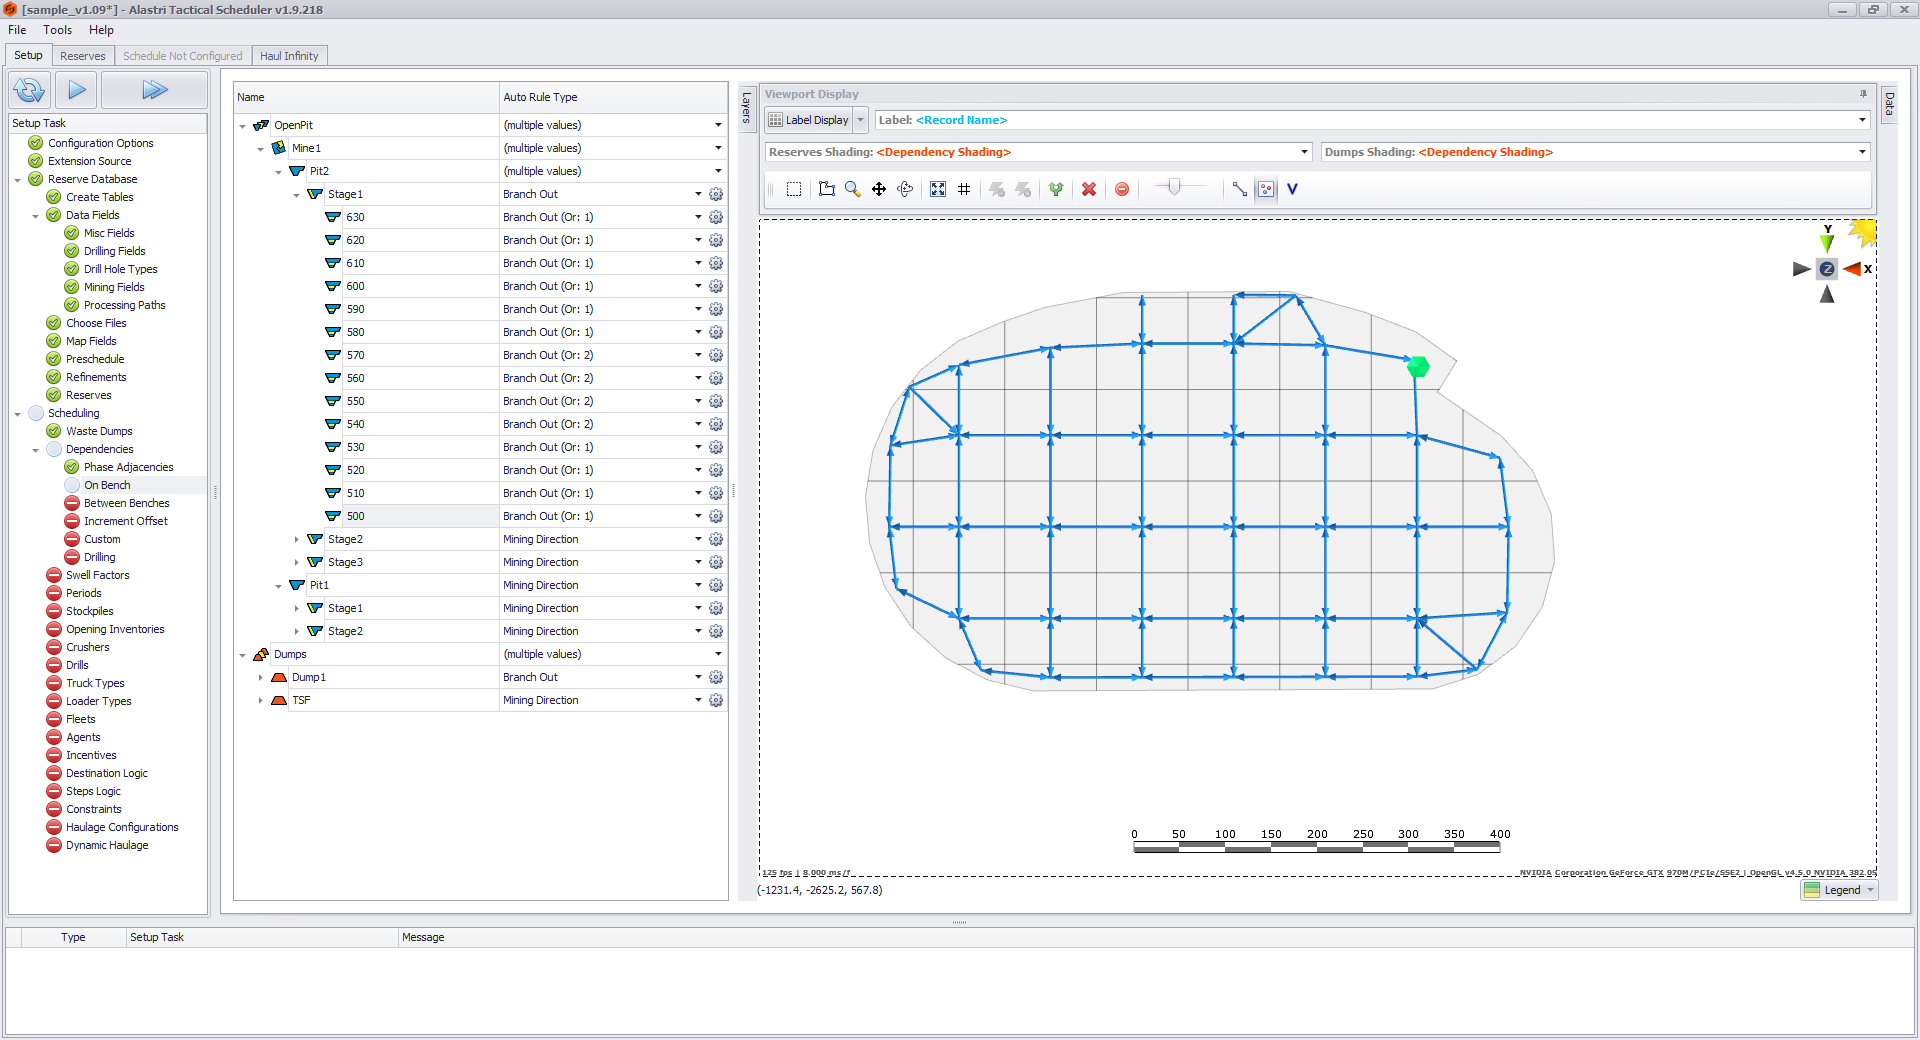
If the pits use Branch Out, update any ramp points  that have moved with redesigns.
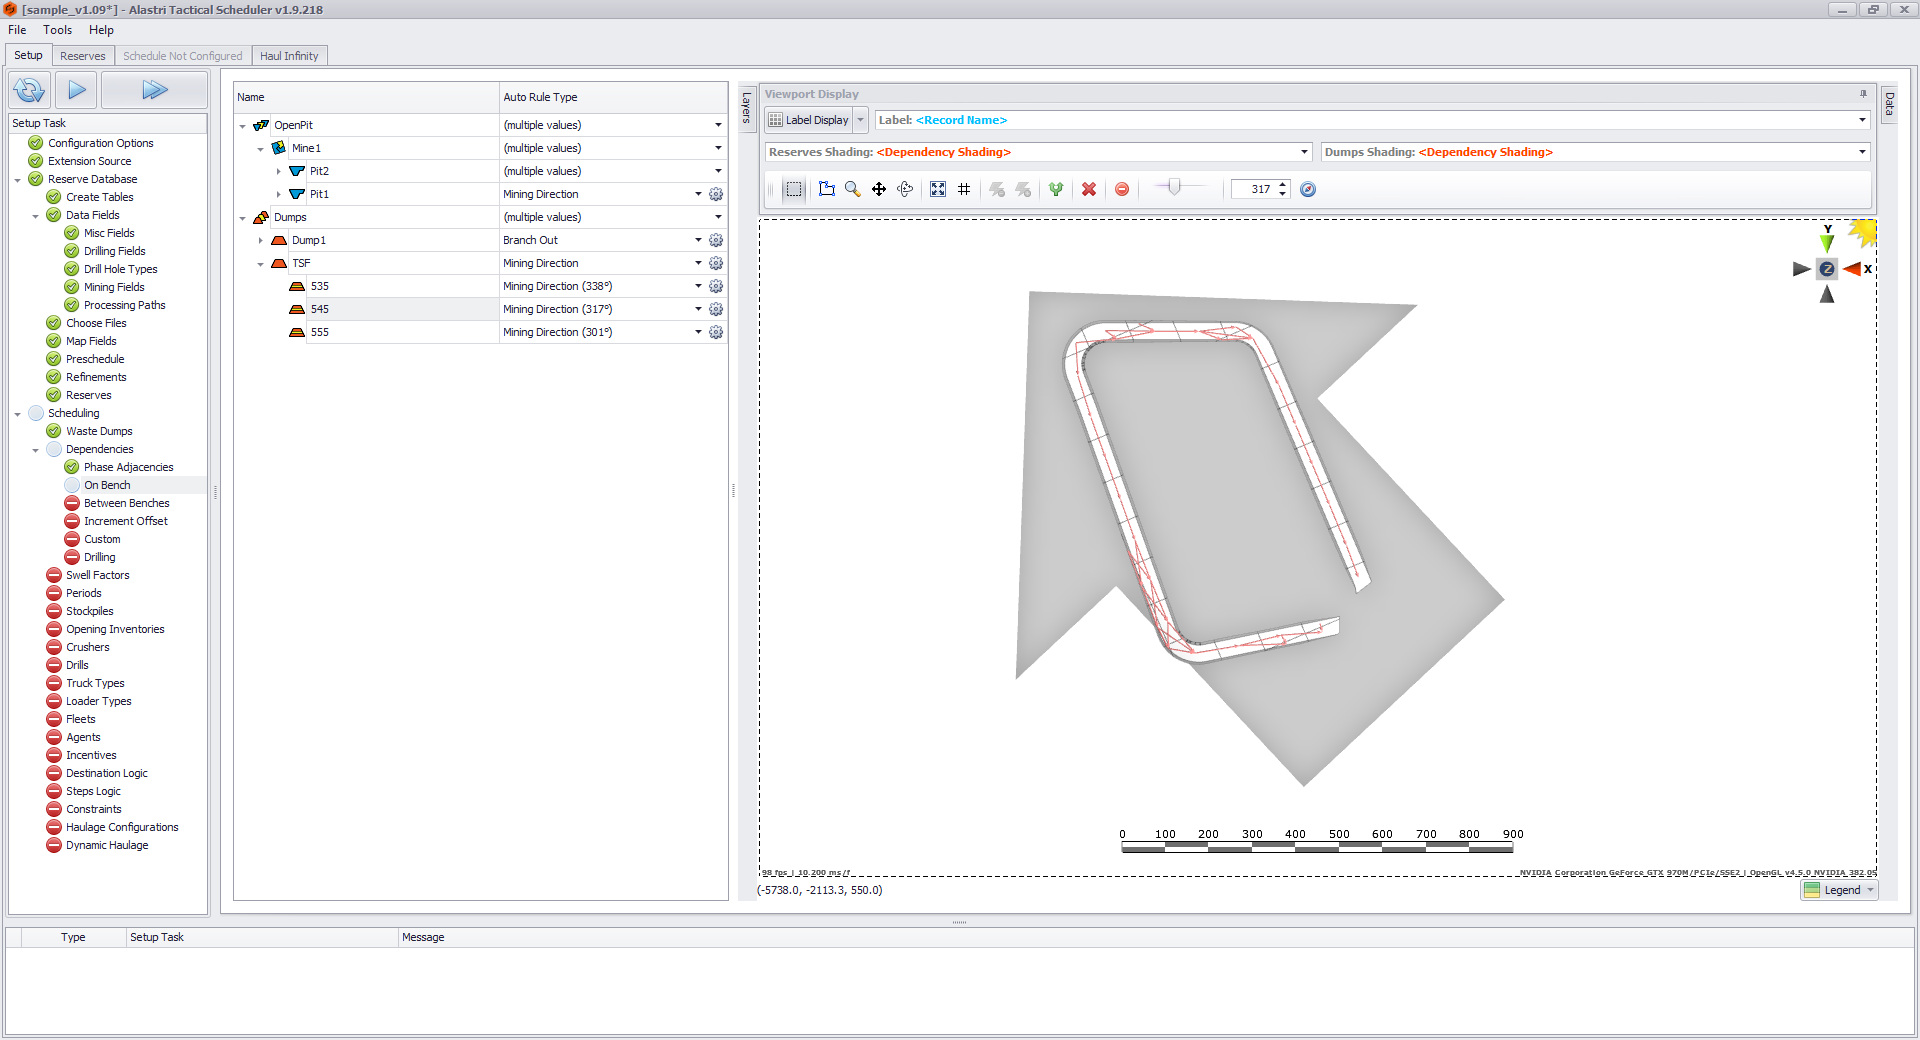
If the dumps use Mining Direction, update the compass bearing  to match any redesigns.
| Auto Rule Type | Description | Recommendation |
|---|---|---|
| Mining Direction | Blocks are mined along the open face from a compass point. | Life of Mine planners with 20+ pits. |
| Branch Out | Blocks are mined along the open face around the ramp point. | Medium Term planners looking for realistic bench development and minimal manual sequencing. |
| None | Blocks are mined in any order on the bench. | Short Term planners with 100% manual sequencing. |
| Duplicate Previous | Copies dependencies from the bench above. | Anyone using Branch Out rules with flitches. |
Between Benches
Between Bench dependencies limit the number of active benches, their working width, and vertical advance rate inside of each stage.
- Expand Distance is the minimum working width; the minimum distance between toe lines and crest lines.
- Max Active Benches prevents new drop-cuts until the Nth bench above is completely mined out.
- Time Delay prevents new drop-cuts until the block has been exposed to daylight for the specified time.
Check that the values from the last plan are consistent and complete.
If you have imported any new benches or pits, change the default values to match the site parameters.
Periods
Use the top button menu to configure the scheduling periods.
- Delete periods from the start of the list to the schedule start point.
- Add periods to the end of the list out to the schedule end end point.
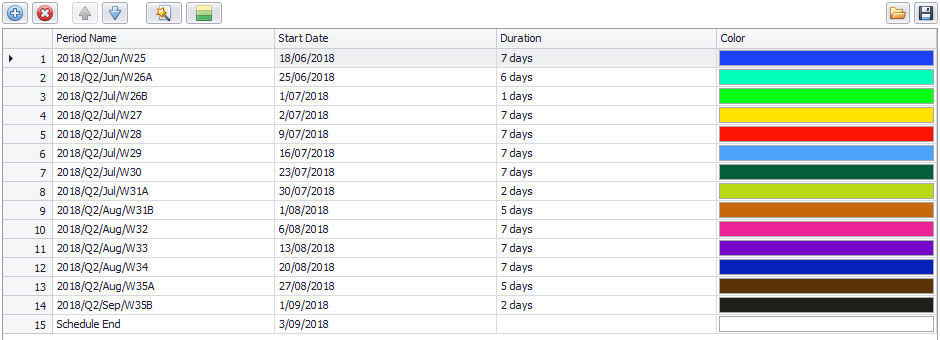
Split-week periods must be manually entered using the top button menu.
If you are not splitting weeks over the month boundaries, you may use the wizard icon  to recreate the period list.
Opening Inventories
Update the stockpile inventories to the schedule starting positions.
Short term planners:
- Open up the site stockpile reporting database.
- For each stockpile, select a material type to represent the current stocks.
- Copy and paste the values into the Opening Inventories.
Medium & Long term planners:
- Open the short term plan ATS model.
- Run the schedule to end.
- Go to Schedule > Reporting > Export Stockpiles After Period > Select the schedule start date > OK
- Return to the current ATS model.
- Go to Setup > Opening Inventories > Clear All (deletes old inventory)
- Go to Setup > Opening Inventories > Import from SPCSV (imports new inventory)
- Inspect values for completeness.
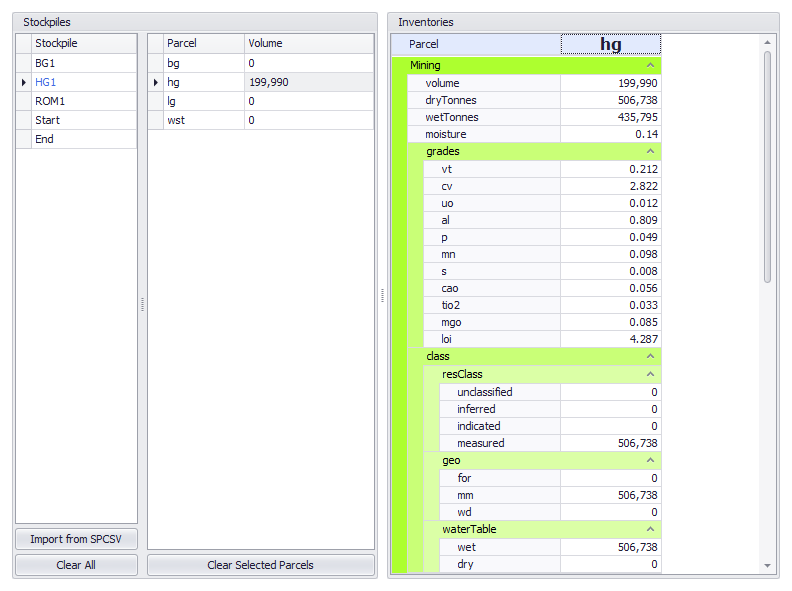 Stockpiles with inventories are formatted with blue text.
Take care to fill out all fields in the opening inventory table. If you leave 'Mining_ProcessStreams_wet_rail_fines_fe' with a value of zero, then the stockpile feed will show zero product grades out the back of the plant.
Incentives
Incentives are used to rank available blocks into a preferred mining order.
- Attractiveness ranks blocks by location.
- SeekParcels ranks blocks by material.
- SeekGrade ranks blocks by grade.
- Priority ranks blocks by a manual scheduling sequence.

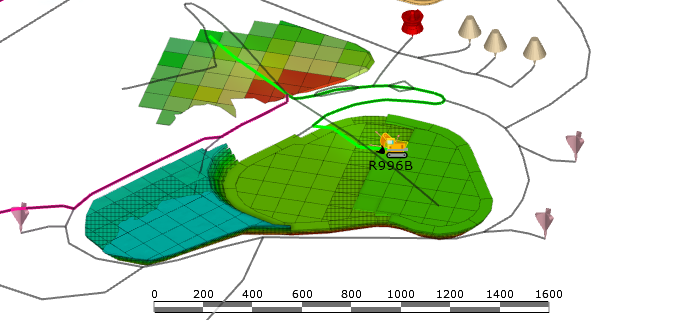
(1) Pit1 development sequence, (2) Pit2 development sequence, (3) R996B location, (4) R9400 location
Short term planners:
Short term planners are recommended to create priority incentives for controlling individual digger locations and bench development sequences.
In the Animation view, we can pre-load the entire mining sequence for Pit1 into the 'Pit1' priority incentive. As a result, whenever any loader is assigned into that pit, it will pick up where the last loader left off, and continue mining out the pit in the specified order. This gives us a high degree of control over how each and every bench is turned over.
If we assign more than one loader into a pit, and require them to exhibit different behaviours (such as mining from different ramps, or campaigning different materials), then we can enter an override sequence for the R996B loader into the 'R996B' priority incentive.
Note that Setup > Incentives just creates the scheduling controls; we do not enter the priority sequence until we get to the Schedule tab.
Schedule > Animation > Priority Incentives > Add / Edit sequence.
Medium & Long term planners:
If there are issues during scheduling, we may come back and add new incentives. For now, run with the same setup as the last plan.
Haulage Configurations
Each Tactical Scheduler file has an attached Haul Infinity file, which is used to calculate the production rates for trucks and loaders.
If you are completely new to Haul Infinity, consider taking a quick detour through these exercises:
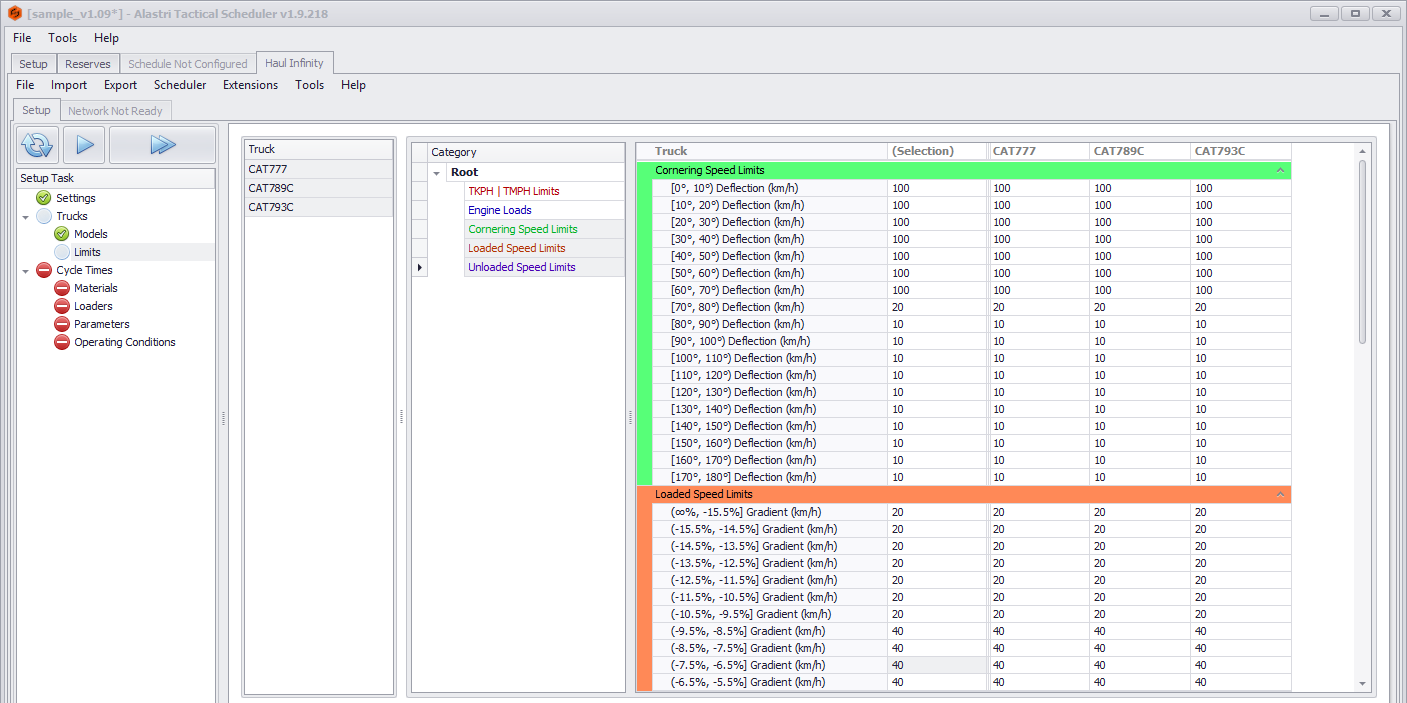
Truck Limits
Go to Haul Infinity > Setup > Trucks > Limits and glance over the truck-specific speed limits.
- Cornering speed limits should be reduced for ninety degree corners and higher.
- Downhill loaded speed limits should be reduced if trucks are locked in gear.
- Uphill loaded speed limits should be reduced to prevent trucks ski-jumping the ramp.
- Downhill unloaded speed limits should be reduced reflect to the site operating procedure.
Parameters
Haul Infinity parameters are used to calculate the production rate on Loaders and Trucks, which in turn affects how much dirt is moved in the schedule. As such, it is critically important to ensure that these numbers are up to date with the latest planning assumptions.
- Open up the latest planning parameters spreadsheet for your site.
- Go to Haul Infinity > Setup > Parameters. Note that the parameters table dynamically adjusts itself to the selected trucks, loaders and material.
- Use the Selections lists to iterate through each truck / loader / material combination.
- Ignore the 'Calculations' section of the Parameters table. Double click on the headers to collapse them.
- In the Overrides section, enter:
- Loader Load Time = Load Time + Spot Time
- Truck Load Time = Load Time
- Truck Payload = Payload
- In the Cycle Time Inputs, enter:
- Truck Matching Types = Theoretical
- Minimum Queue Time = Zero
- Truck Spot Time at Loader = Spot Time
- Truck Dumping Time = Dumping Time
Loader Load Time ≠ Truck Load Time
Most planning parameters use "Load Time" to refer to Truck Load Time. Make sure that Loader Load Time = Load Time + Spot Time.
If queue time is already accounted for in the Time Usage Model, then set:
Truck Matching Type = Theoretical
Minimum Queue Time = 0
This removes queue time from the Haul Infinity cycle times.
Network
The Haul Infinity network is used to calculate return travel times in each haul cycle. The haul network should be configured with accurate routes and speed limits so that the schedule returns achievable tonnage targets.
Connect Blocks
- Go to Haul Infinity > Network tab.
- Open the 'Scheduler' menu item and select 'Import Blocks From Scheduler'.
- Go to the Blocks panel in the bottom left. Expand the tree to find unconnected benches (denoted by the icon
 ).
). - Double click the pit or bench to centre the blocks on screen.
- Use the pencil icon to digitise a ramp or road to the blocks.
- Set the snapping mode to Points
 when connecting to existing roads.
 - Set the snapping mode to Surfaces
 when drawing new roads.
- Set the snapping mode to Points
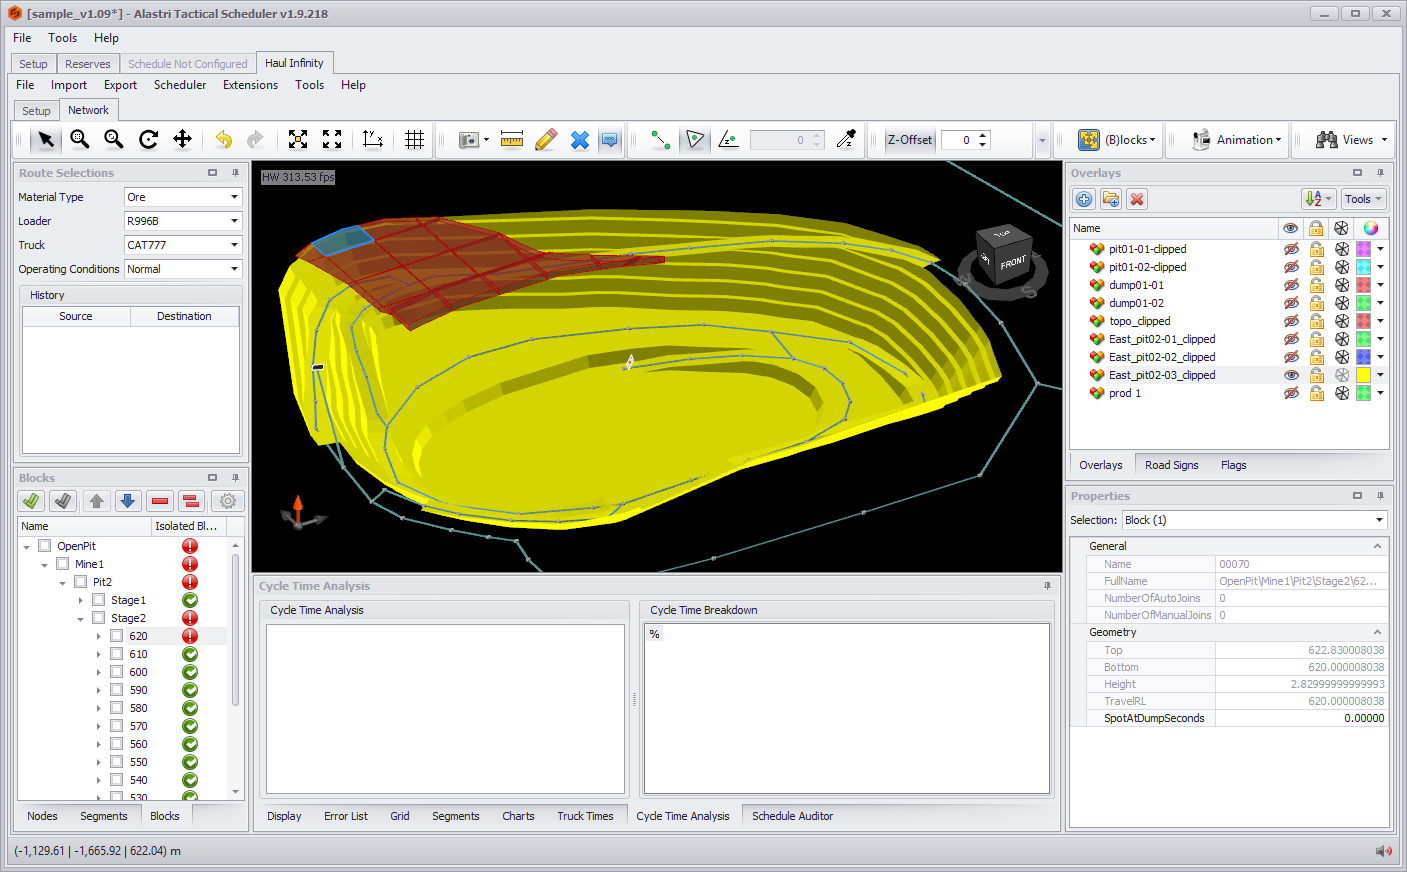
Blocks without network connections.
Blocks with network connections. The spaghetti string is the route, the purple balloon is the connection.
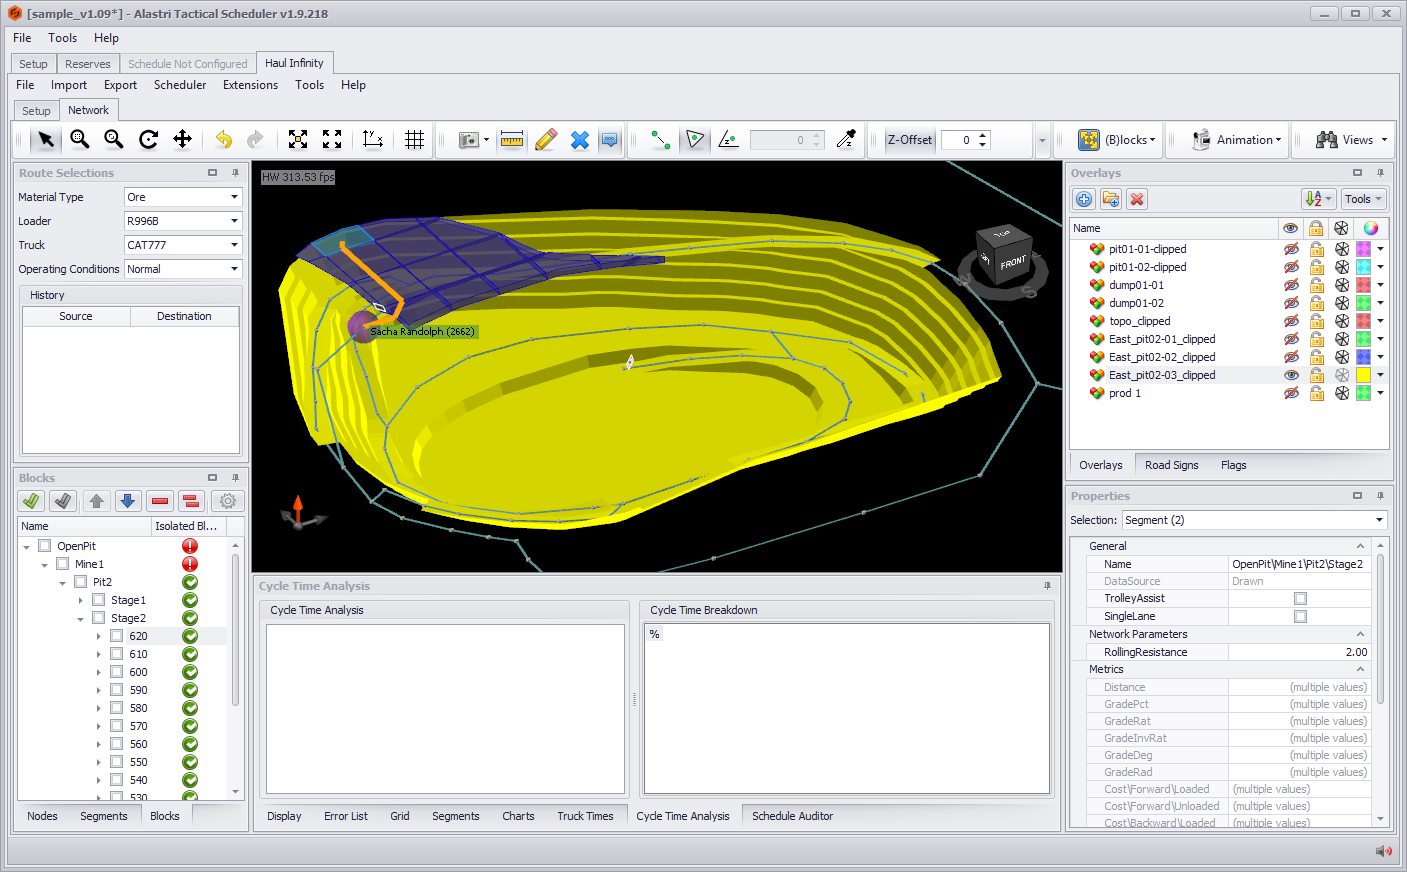
Manage Joins
Make sure to rename the segments in the Properties panel every time a new road is drawn in Haul Infinity.
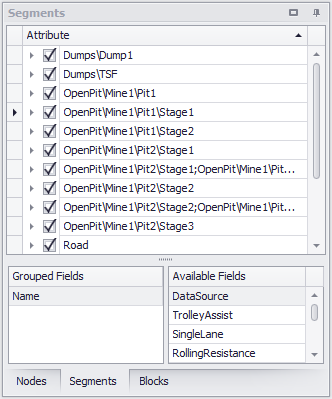
Example of a well-maintained road network.
If your project is set up as shown above, then:
- Go to Extensions > Assign Joins Based on Segments Names.
- Go to the Blocks panel in the bottom left. Expand the tree to find unconnected benches (denoted by the icon ).
- Double click the pit or bench to centre the blocks on screen.
- Select one of the disconnected blocks.
- Go to the Properties panel and copy the Mine\Pit\Stage address.
- Select the appropriate road or ramp that the blocks should connect to.
- Go to the Properties panel and paste the Mine\Pit\Stage address in the Name field (use semicolons as delimiters).
- Repeat the process from Step 1.
This method ensures that trucks take the correct route out of the pit, instead of taking shortcuts.
Calendar Inputs
Finish the setup and navigate to the Schedule tab > Calendar control.
Input the necessary planning parameters.
Crushers
Enter the crusher capacity into Schedule > Calendar > Crushers. This may be defined by a rate or a flat target, depending upon what availability types have been specified in Setup > Crushers.
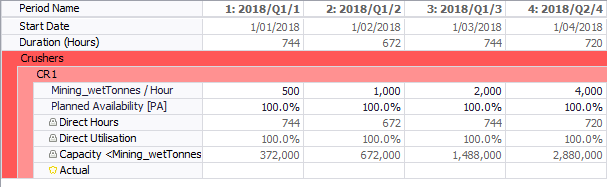
Enter the crusher capacities in each period of the Calendar.
Loaders
Enter the excavator numbers and time usage into Schedule > Calendar > Loaders. This may be defined by a rate or a flat target, depending upon what availability types have been specified in Setup > Loaders.

Enter the loader numbers and time usage by period.
Trucks
Enter the truck numbers and time usage into Schedule > Calendar > Trucks. This may be defined by a rate or a flat target, depending upon what availability types have been specified in Setup > Trucks.

Enter the truck numbers and time usage by period.
Steps
If you have defined variable step ratios in the Steps Logic, then they will appear in Schedule > Calendar > Steps.

Enter step ratios by period.
Failure to input step ratios may result in a schedule fault.
Drills
If you are using Drills, then enter the drill parameters into Schedule > Calendar > Drills.
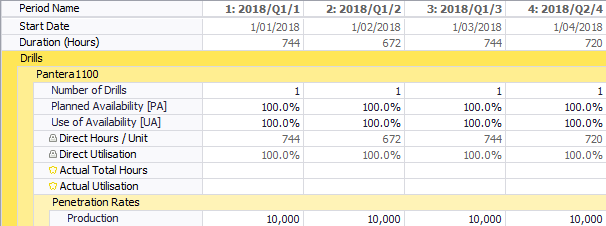
Enter the drill parameters by period.
Agents
If you are using Loaders as Agents, then enter the Agent Rate into Schedule > Calendar > Agents.

Enter the Agent Rate (target tonnes / loader hours).
Product Specs
If you are using Optimised Products mode, then enter the cash flows and targets into Schedule > Calendar > Product Specifications.
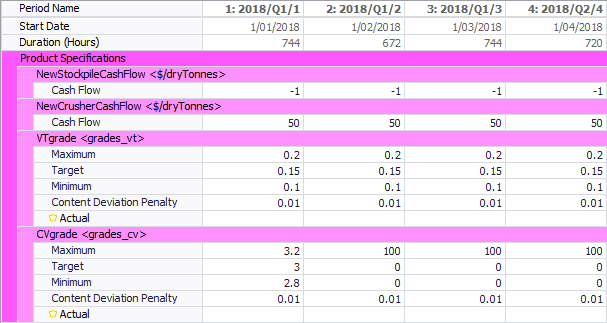
Enter the product specifications by period.
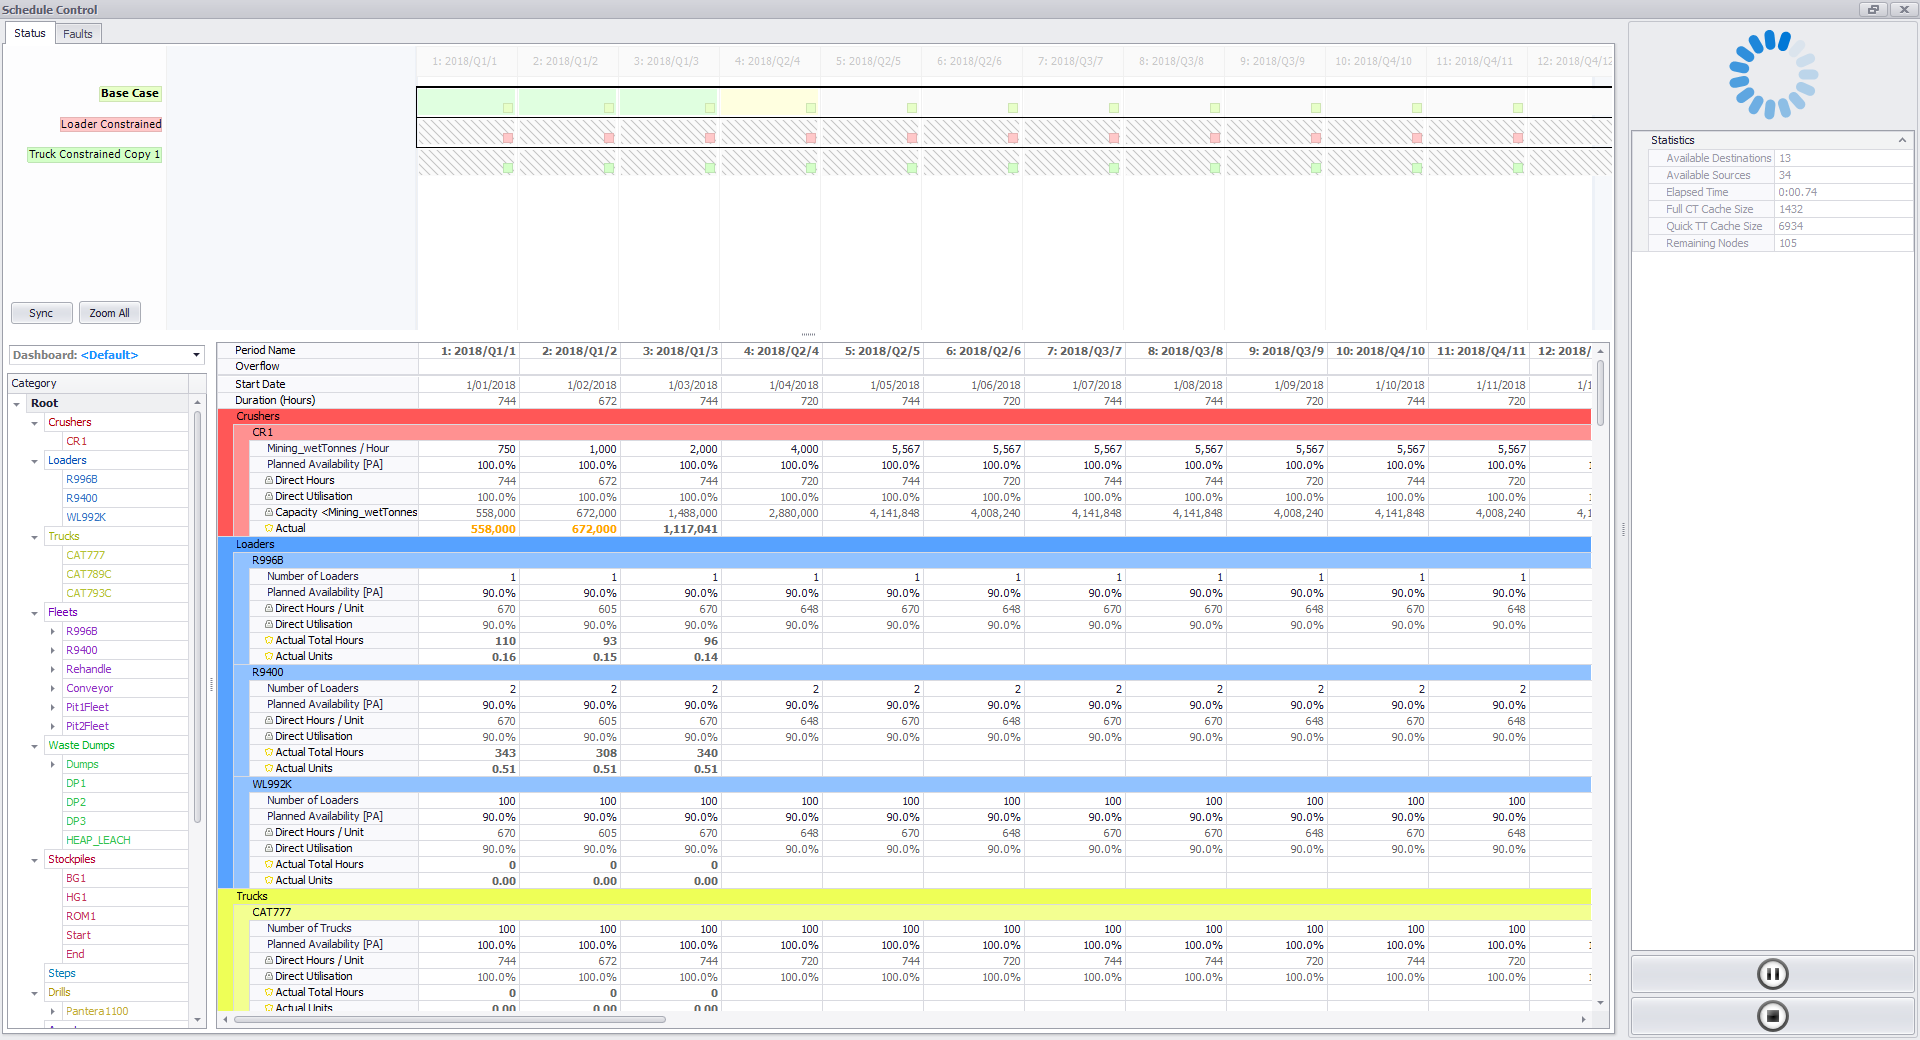
Schedule Quick Check
Press the 'Run Scenario' button to run out the schedule using last plan's values.
- Scheduled periods are shaded green in the scenario panel.
- Bold calendar values are actual schedule results.
- Bold orange calendar values show where targets have been hit.
Destination Check
Create a pivot table to validate the destination logic setup:
- Go to Schedule tab > Reporting tab >
 Add Pivot Report.
 - Click in the name field and rename to "Destination Check".
- Drag Activity Type into the Filter Area and set the filter to show Mining only.
- Drag Mining_wetTonnes into the Data Area.
- Drag Destination.Top into the Columns Area.
- Drag Source Parcel into the Row Area.
- Drag Destination Logic Rule into the Row Area.
Use this table to identify if any Destination Rules are sending material to the wrong location.
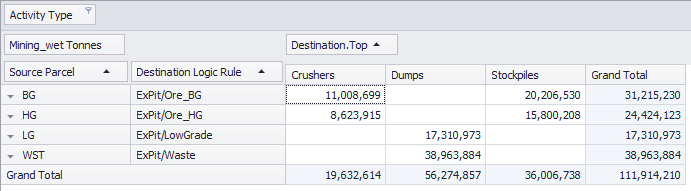
For added detail, try dragging Source.Mine/Pit/Stage into the Row Area.
If any material is going to incorrect destinations, revert to Setup > Destination Logic and make the appropriate changes.
Step Logic Check
Create a pivot table to validate the step logic setup:
- Go to Schedule tab > Reporting tab > Add Pivot Report.
- Click in the name field and rename to "Step Logic Check".
- Drag Activity Type into the Filter Area and set the filter to show Mining only.
- Drag Mining_wetTonnes into the Data Area.
- Drag Fleet into the Column Area.
- Drag into the Row Area:
- Source.OpenPit
- Destination.Top
- Step Logic Rule
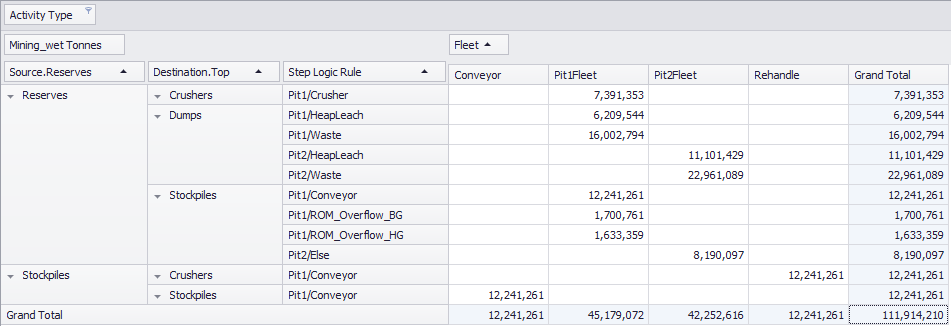
For added detail, try adding Source Type and Destination Type to see the individual step logic components.
If any fleets are being used on the wrong transactions, revert to Setup > Steps Logic and make the appropriate changes.
Loader Rate Check
Create a pivot table to validate the production rates being used by the excavation equipment:
- Go to Schedule tab > Reporting tab > Add Pivot Report.
- Click in the name field and rename to "Loader Rate Check".
- Drag Activity Type into the Filter Area and set the filter to show Mining only.
- Drag Loader into the Row Area.
- Drag MutexParcel.Haulage into the Row Area.
- Drag HaulageResult.LoaderProductionRate.WTPH into the Data Area.
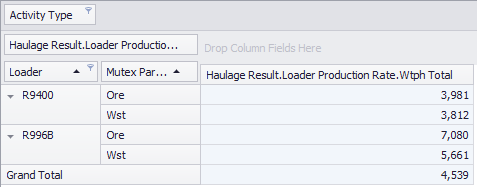
For projects using Loaders as Agents, drag Agent Rate field into the Data Area for direct comparison.
If any loading equipment is using the wrong dig rate, revert the Haul Infinity > Setup > Parameters and make the appropriate changes.
Cycle Time Check
Create a pivot table to validate the average cycle times being used by trucks.
- Go to Schedule tab > Reporting tab > Add Pivot Report.
- Click in the name field and rename to "Loader Rate Check".
- Drag Activity Type into the Filter Area and set the filter to show Mining only.
- Drag Truck into the Row Area.
- Drag Source.Mine/Pit/Stage into the Row Area.
- Drag Destination.Name into the Column Area.
- Drag HaulageResult.Times.Total into the Data Area.

Average cycle time pivot table
If any cycle times are clearly wrong, filter by source and destination to get the route and revert to Haul Infinity > Network to make to appropriate changes.
Note that the HaulageResult fields return the instantaneous property of the haul cycle. For instance, "HaulageResult.FuelBurn.Total" is the fuel burn of a single return trip on that haul, not the actual fuel burned for this schedule transaction (which may represent a fraction of a haul). The same goes for HaulageResult.Distance, HaulageResult.Times, and so on.
To calculate the actual time or fuel used, you must take the sumproduct of the property with HaulageResult.NumberOfTrips.
Animation Check
Review the animation to see that pits are being mined in a logical fashion.
- Drag the slider below the viewport to see the animation.
- Select a block and right the square bracket keys to step through the block's mined states.
- Jump to a specific period start date by using the dropdown selector in the bottom right of the screen.
Underground Mining
If any stage is under-cutting another stage, revert to Setup > Phase Adjacencies and make sure the lower stage references the higher stage as an Adjacent Stage.
Rubbish Haul Routes
If trucks are continuously taking the wrong haul route, revert to Haul Infinity > Network and correct the block joins / road segments as required.
Blocks Not Mining
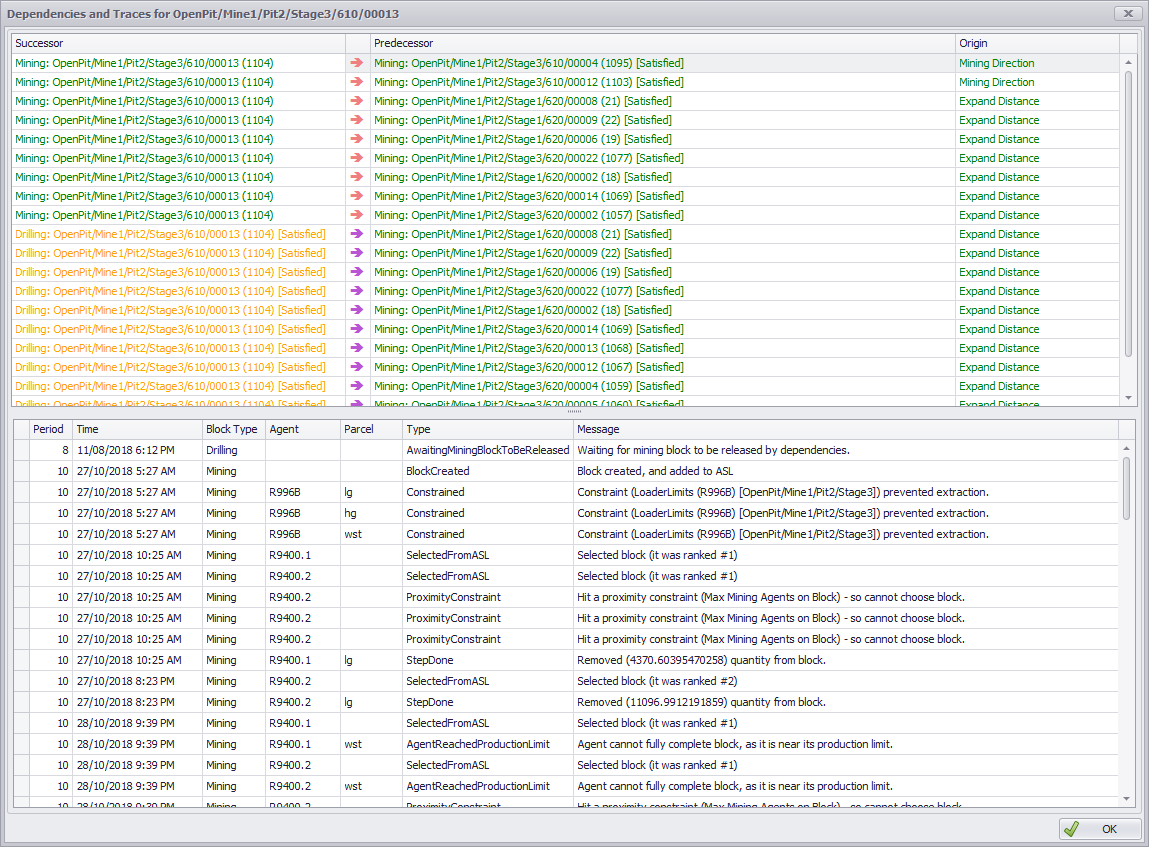
To understand why a block is not being mined, Select the block > Right click > Show Dependencies and Traces.
- In the dependencies list, use the 'Origin' field to figure out what dependency is holding up a block (if any).
- In the trace list, use the 'Message' field to figure out what constraint is holding up a block (if any).
Once the problem is identified, revert to that step and make the appropriate changes.
Generating a Schedule
See ATS Run Schedule.