ATS Drill Scheduling
How to set up drill scheduling in a production model.
Introduction
Drill scheduling introduces delays relating to blasted stocks, available real estate, and fleet logistics.
The feature is intended for sites with narrow contours and/or cutbacks, where digger scheduling must take into account the time to campaign-drill areas before mining.
Drills can be limited by both fleet numbers and by drilled stock limits, which can be used to estimate drill numbers required in medium to long term plans.
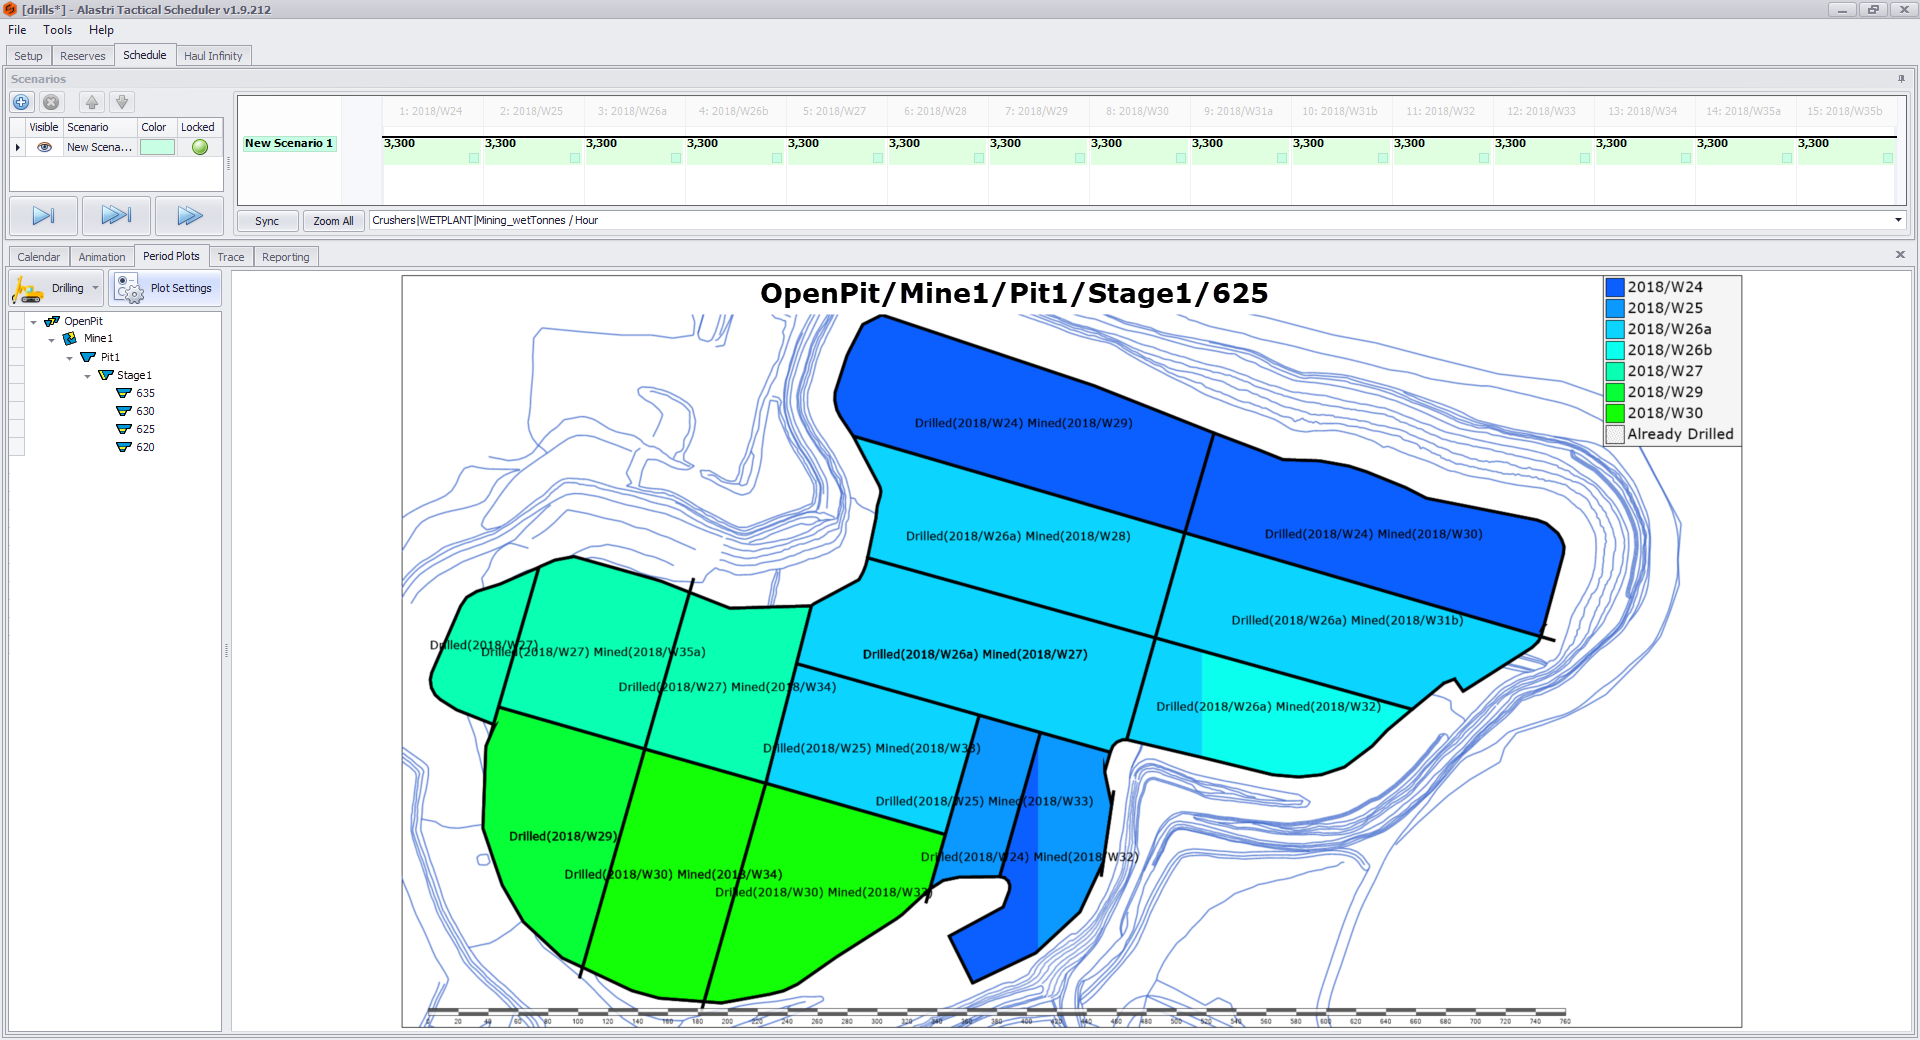
Finished plans may be published as a colour-coded drill plot for issue to 48-hour planners.
Workload
Drill scheduling requires preparing, importing and using data in addition to the existing production schedule workload.
Rapid Reserver
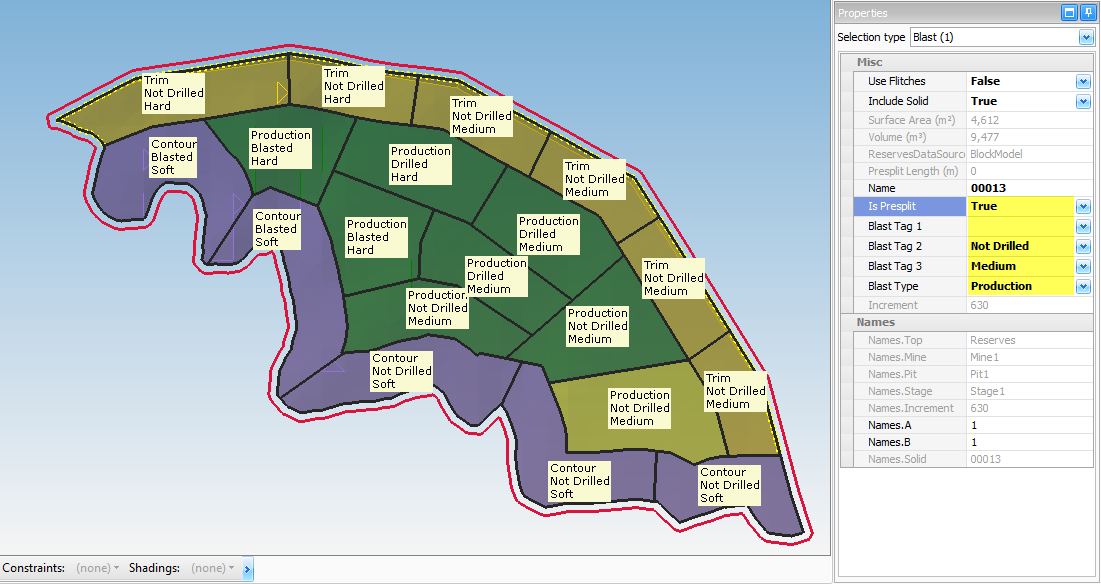
- Enter block properties such as Shot Type, Block Type, Hardness, Blast Status.
Tactical Scheduler
- Enter drill meters remaining in half-drilled shots.
- Enter number of drills operating in a pit, stage or bench.
- Enter manual drill sequences at the bench level (if required).
Setup Procedure
Step by step guide to set up drill scheduling in a production model.
Rapid Reserver
In Rapid Reserver, add the blast properties which will affect drilling.
- Block Type: Contour, Ramp, Trim, Production
- Shot Type: Presplit, Wall Control, Production
- Rock Type: Hard, Medium, Soft
- Blast Status: Not Drilled, Drilled, Blasted
Choose blast properties that are appropriate for your site.
Blast Tags
Configure the block tags in Rapid Reserver > Designer tab > Display menu.
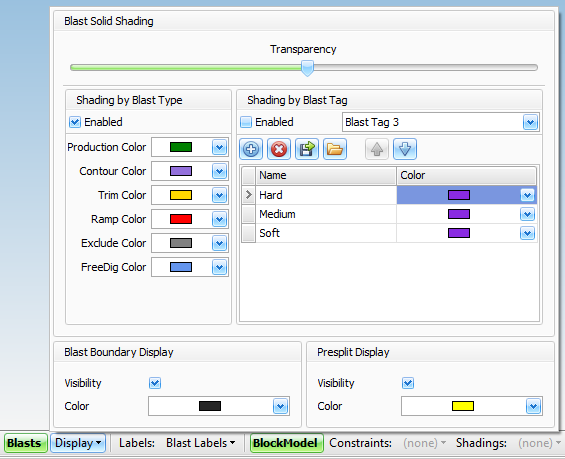
Where required, update blocks with their blasting parameters.
- Blanks will be assigned default blast parameters (ie. medium hardness, production shot).
- Blocks labelled "Blasted", "FreeDig", or "Backfill" will be assigned zeroed blast parameters.
Tactical Scheduler Setup
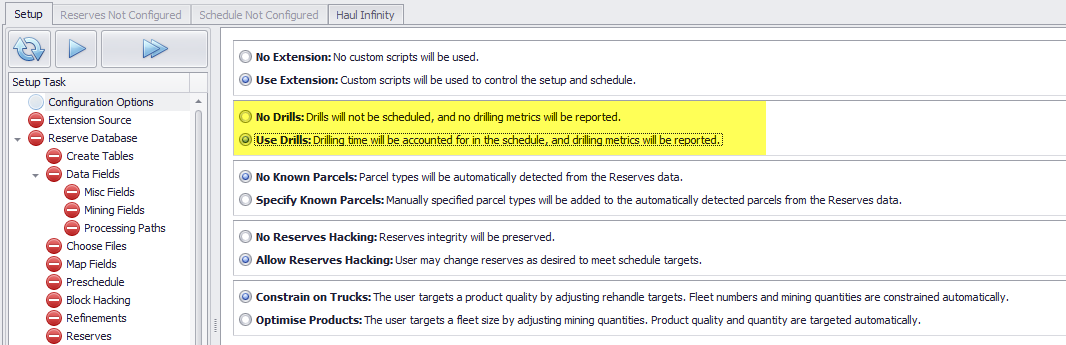
Configuration Options
In Setup > Configuration Options, select 'Use Drills' to turn on Drill Scheduling.
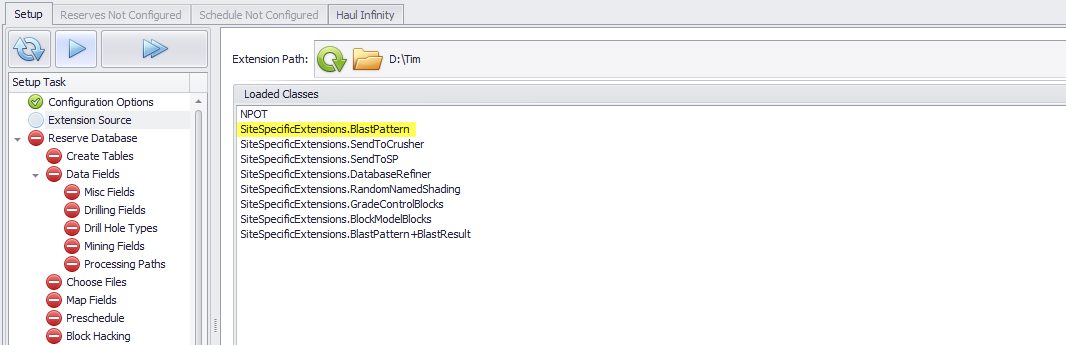
Extension Source
In Setup > Extension Source, select the Site Specific Extension that has been provided by Alastri. The extensions hold the logic for populating block-by-block drill quantities from user inputs.
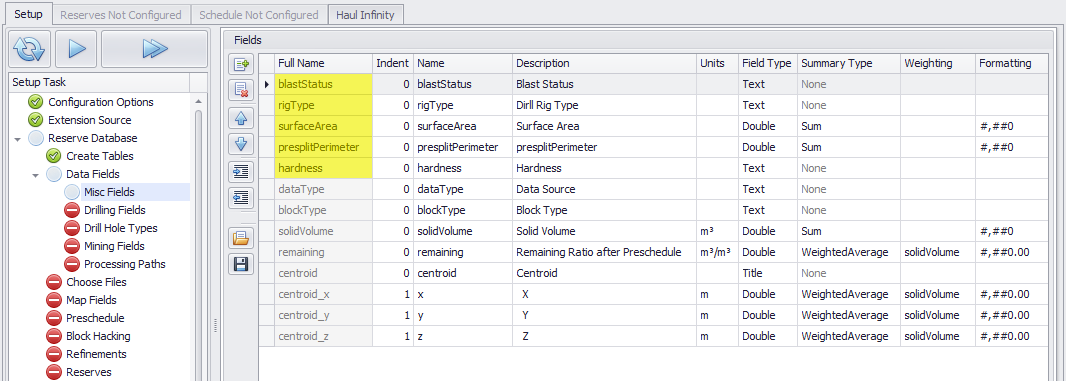
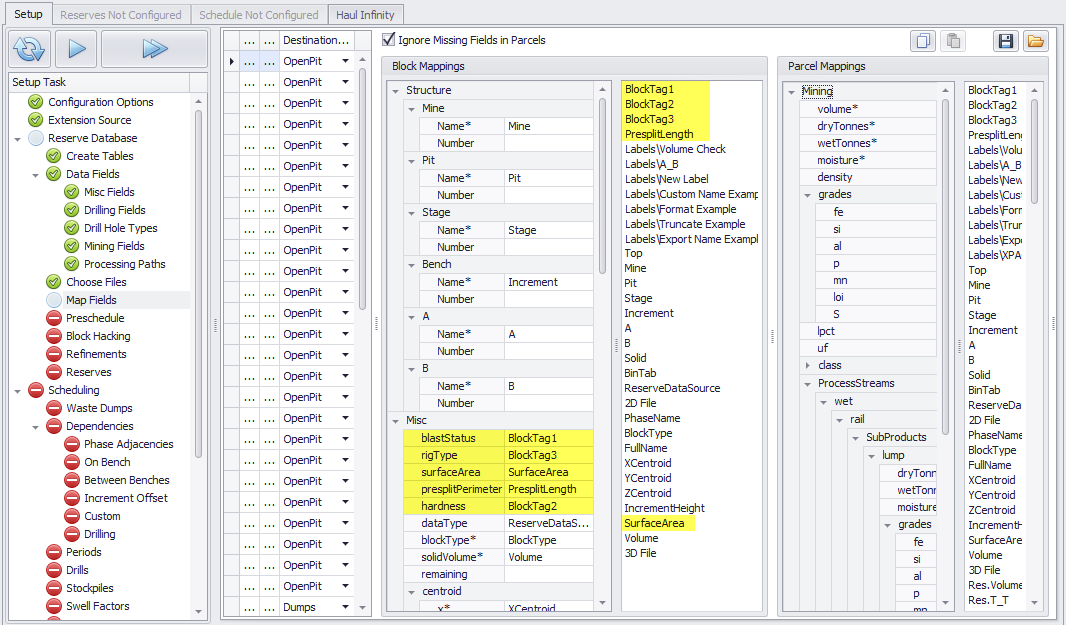
Misc Fields
In Setup > Misc Fields, create new Misc Fields to classify the blast blocks:
- Surface Area
- Presplit Perimeter
- Blast Status
- Hardness
- Rig Type
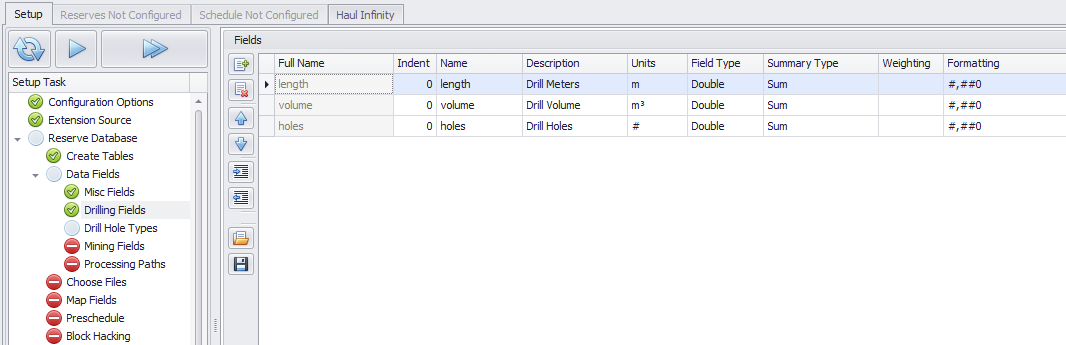
Drilling Fields
In Setup > Drilling Fields, add reporting fields such as number of holes, length, volume, and so on.
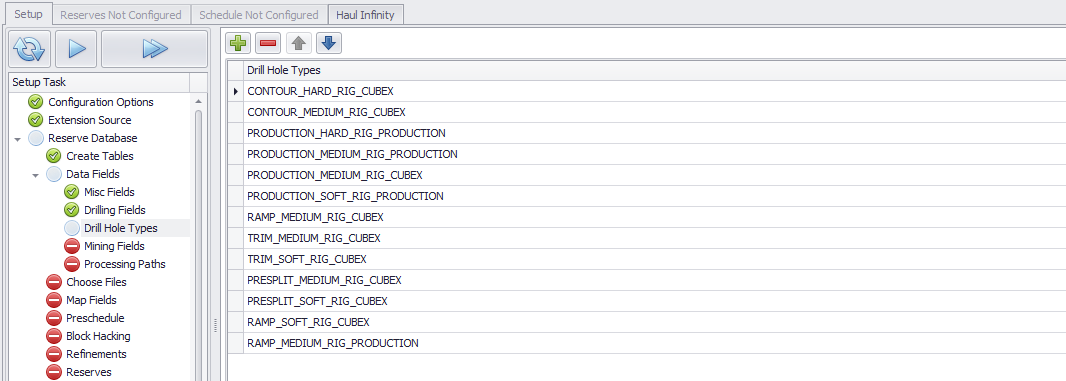
Drill Hole Types
In Setup > Drill Hole Types, add the hole types that will be encountered in the project.
Map Fields
Map the reserves values into the new Misc Fields.
Refinements
In Setup > Refinements, parameter input tables are displayed for every hole type that is detected in the reserves. Enter the appropriate parameters for each hole type.
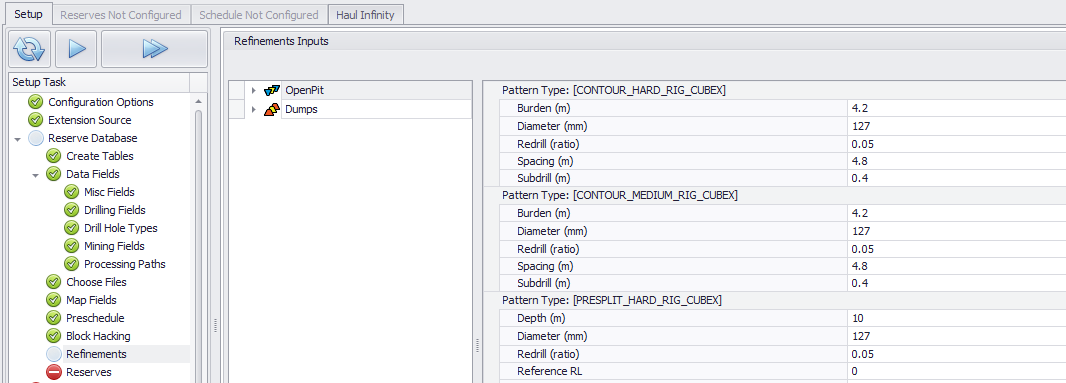
Blast parameters and calculation methods may be configured in the Site Specific Extension.
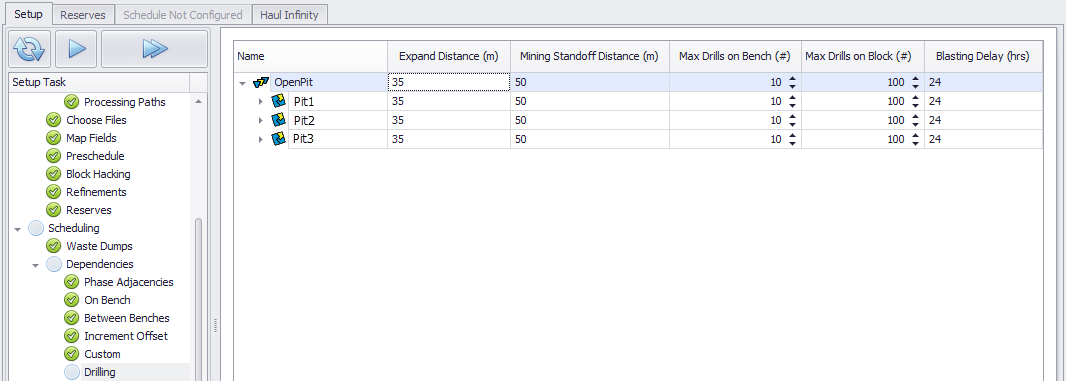
Drilling Dependencies
In Setup > Dependencies > Drilling, enter the dependencies to be used in each mine, pit, stage or bench.
- Expand Distance: a block may only be drilled if all blocks within the Expand Distance have been mined out.
- Mining Standoff Distance: minimum distance between any drill and any loader.
- Max Drills on Bench: limit the total number of drills on the bench.
- Max Drills on Block: limit the total number of drills on a block.
- Blasting Delay: fixed blasting delay by bench*.
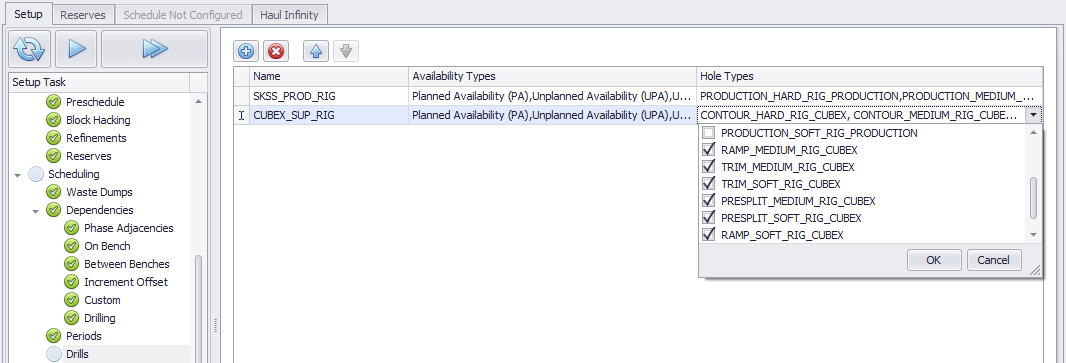
Drill Types
In Setup > Drills, add the drill rig types to be used in scheduling.
- Tick the availability types to be added as rows in the Calendar.
- Tick the hole types that can be drilled by each rig type.
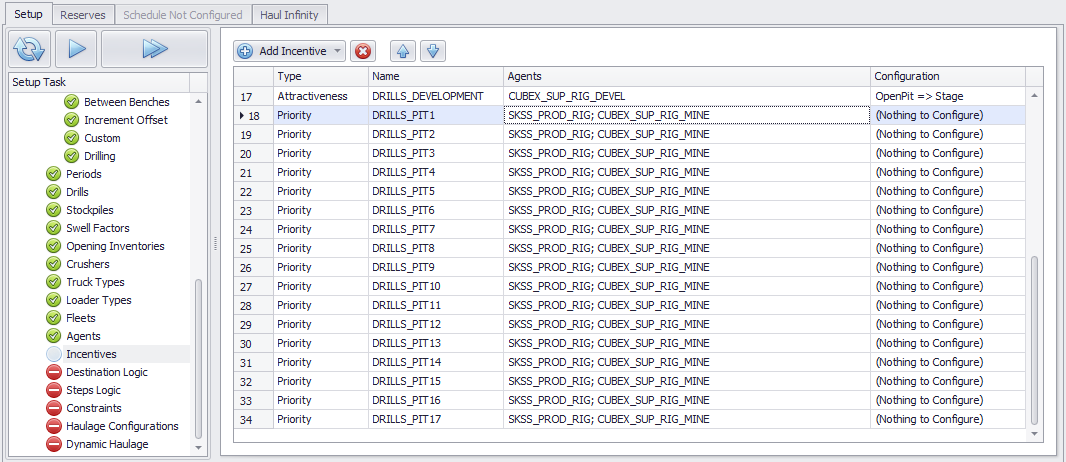
Incentives
In Setup > Incentives, add priority incentives to store the drilling sequence for each pit.
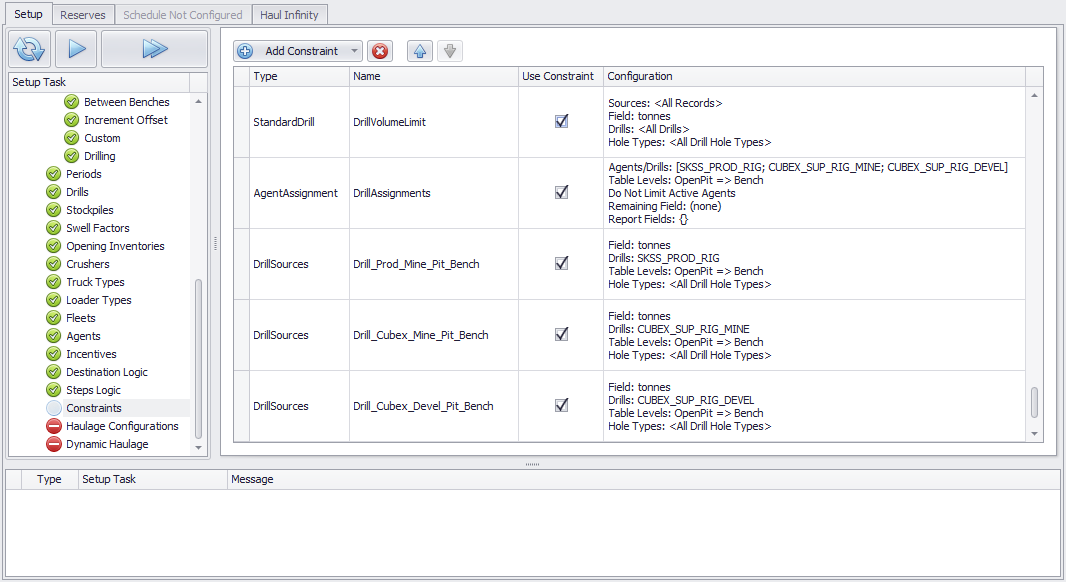
Constraints
In Setup > Constraints, add constraints to control blast stocks limits, drilling meters by pit or bench, and drill unit assignment by area.
- Constrain stocks blasted in the period with a Standard Constraint on drill volume.
- Constrain number of each drill type by pit or bench with an Agent Assignment Constraint.
- Constrain drill quantities by pit or bench with a DrillSource Constraint.
Schedule Calendar
Drills
Enter the total number of drills and time usage by period.
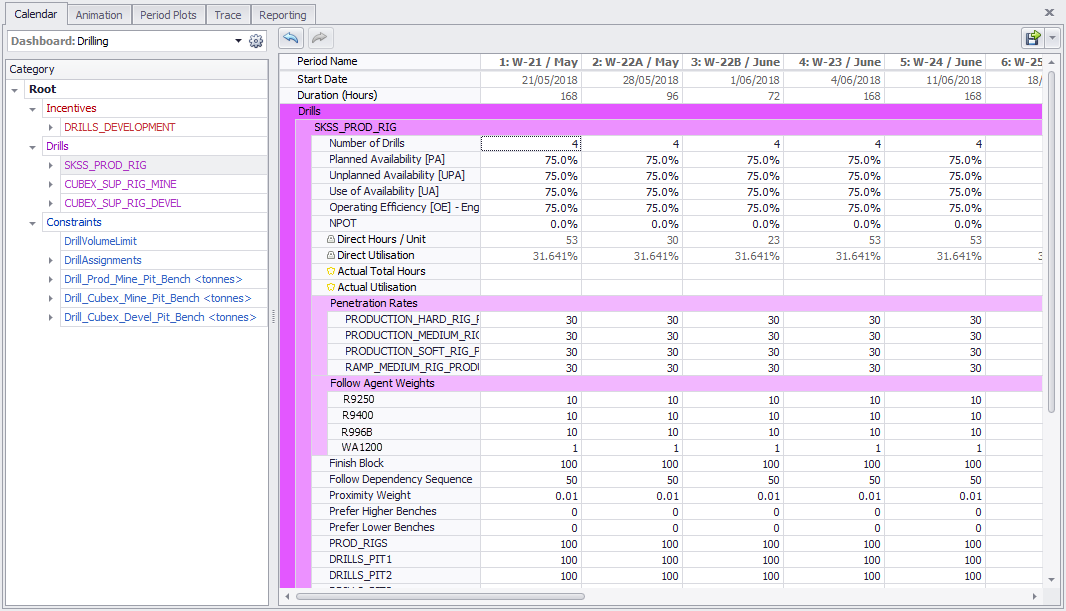
Beneath each drill, enter the weightings to control which blocks it chooses to mine on the bench:
- Finish Block: incentive to finish drilling the current block.
- Follow Dependency Sequence: incentive to drill blocks that are available to the digger.
- Proximity Weight: incentive to reduce tramming to next block.
- Prefer Higher Benches: incentive to drill higher elevations.
- Prefer Lower Benches: incentive to drill lower elevations.
- <User Defined> Priority Incentives: follow the user's manual sequence.
Priority Incentives are defined in Setup > Incentives. The manual sequence is entered in Schedule > Animation > Priority Incentives.
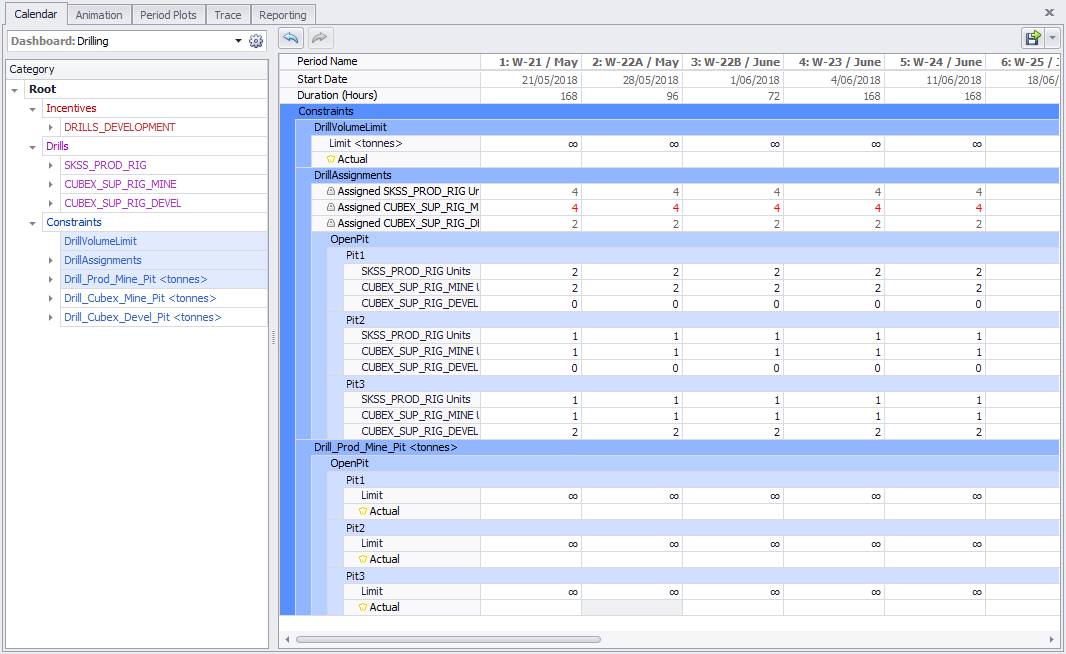
Constraints
Enter the values by period in each constraint.
- Constrain stocks blasted in the period with a Standard Constraint on drill volume.
- Constrain number of each drill type by pit or bench with an Agent Assignment Constraint.
- Constrain drill quantities by pit or bench with a DrillSource Constraint.
Priority Sequencing
Go to the Animation tab and find the Priority Incentives panel in the top left corner. At the beginning of the schedule, edit the priority incentive for each pit and pre-assign the drill sequence for the entire pit. This way, whenever you assign a drill to this pit in Calendar > Constraints > Drill Assignments, it will pick up the sequence where the last drill left off.
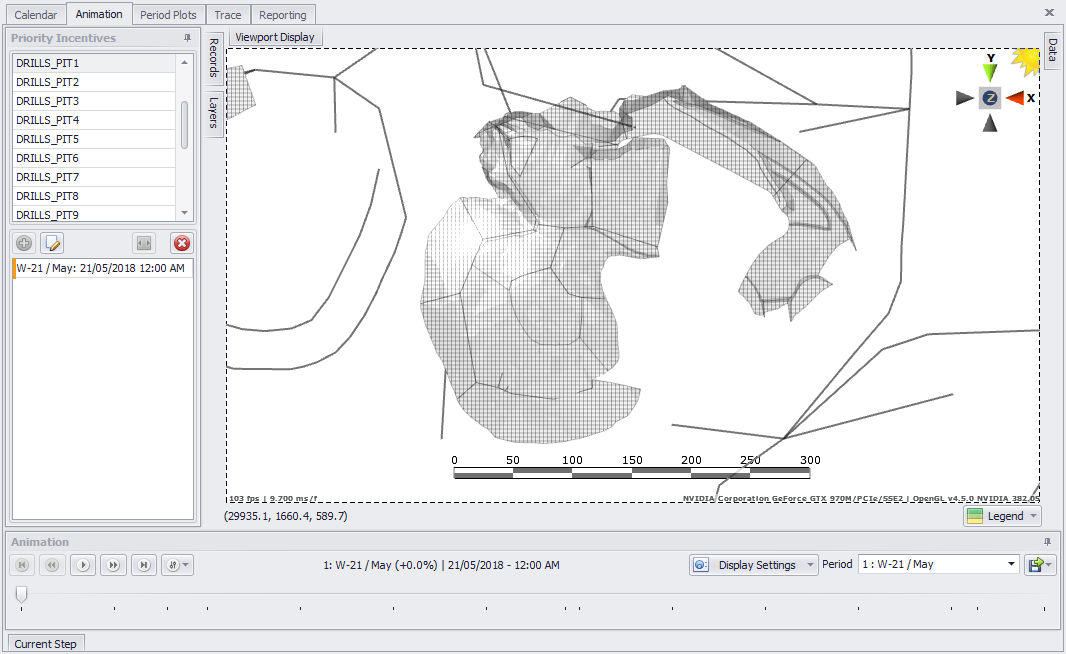
To enter priority sequences:
- Use the slider below the viewport to view the nominated sequence.
- Blocks can be inserted in the sequence by moving the slider to the insertion point and adding blocks with the 'Draw Sequence' tool.
- Blocks can be removed from the sequence by selecting them in the list and pressing the remove
 icon.
icon.
To ban blocks from drilling or mining:
- Click the 'Draw Blockers' tool and select blocks to ban from the all activities.
- Blocks can be unbanned by selectin them in the list and pressing the remove icon.
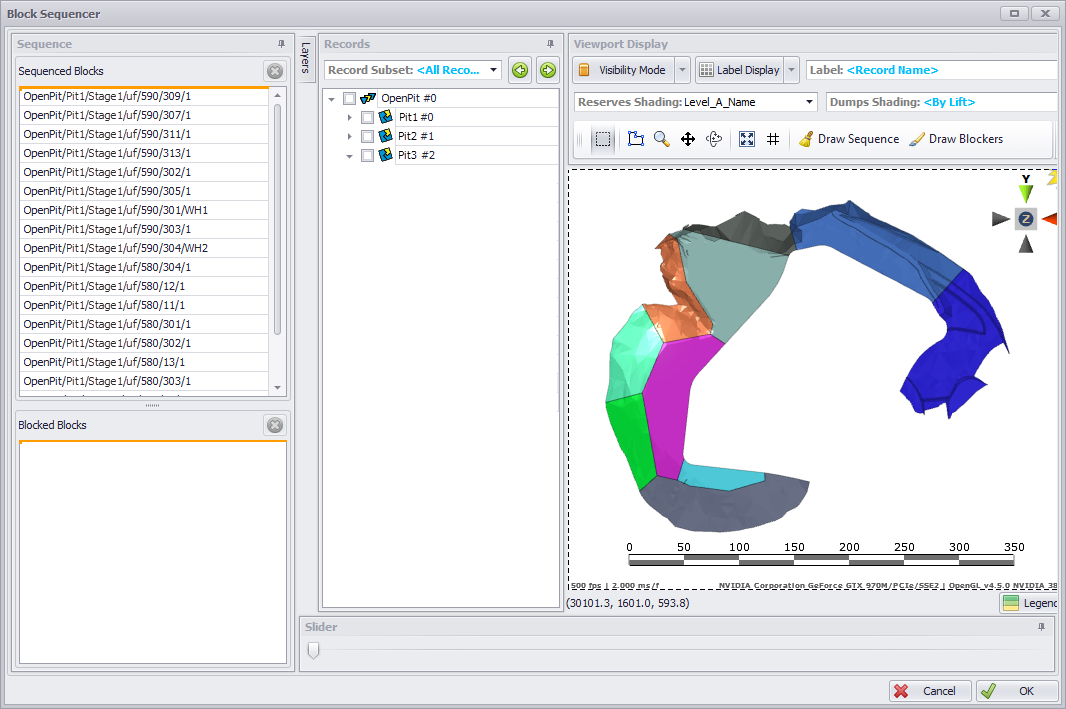
Note that each Priority Incentive may have more than one Priority Sequence listed under it. Each Priority Sequence persists from its starting time until the starting time of the next Priority Sequence, at which point the first sequence is completely flushed.
For example, if you ban blocks at Time X, then add a new priority sequence at Time Y with no banned blocks, then those blocks will be considered unbanned and available for drilling/mining.