ATS MPAS CSV Import Tool
This tool enables MPAS users to export blocks.zip files directly from the block model management system. These can then be imported to ATS in Setup > Choose Files.
Setting Up
- Navigate to %localappdata%\Alastri Hub\Programs\TS\1.8.*
- Right click on Alastri.Scheduler.MPAS.exe and select Copy
- Right click on the desktop and select Paste Shortcut
- Right click on the shortcut and rename to MPAS CSV Import
Once complete, double click MPAS CSV Import to run.
Operation
Using the import tool is as simple as supplying the input files (the Config XMLs, Input CSVs and Field Setup CSV) and clicking 'Export Blockzip'.

Add the Config XML and Input CSV files using the  buttons and selecting the files from your hard drive or network location. Do the same for the Fields Config CSV by clicking the '...' icon to the right hand side of the window.
Finally, click 'Export Blockzip' to start the process.
Any errors in your input file (eg missing fields, corrupt data) will cause the tool to fail and provide information about the error.
If there are no errors, the tool will prompt you to choose a name and location for your output Block Zip file.
Input CSV file
An input CSV contains the data itself, along with some header information.
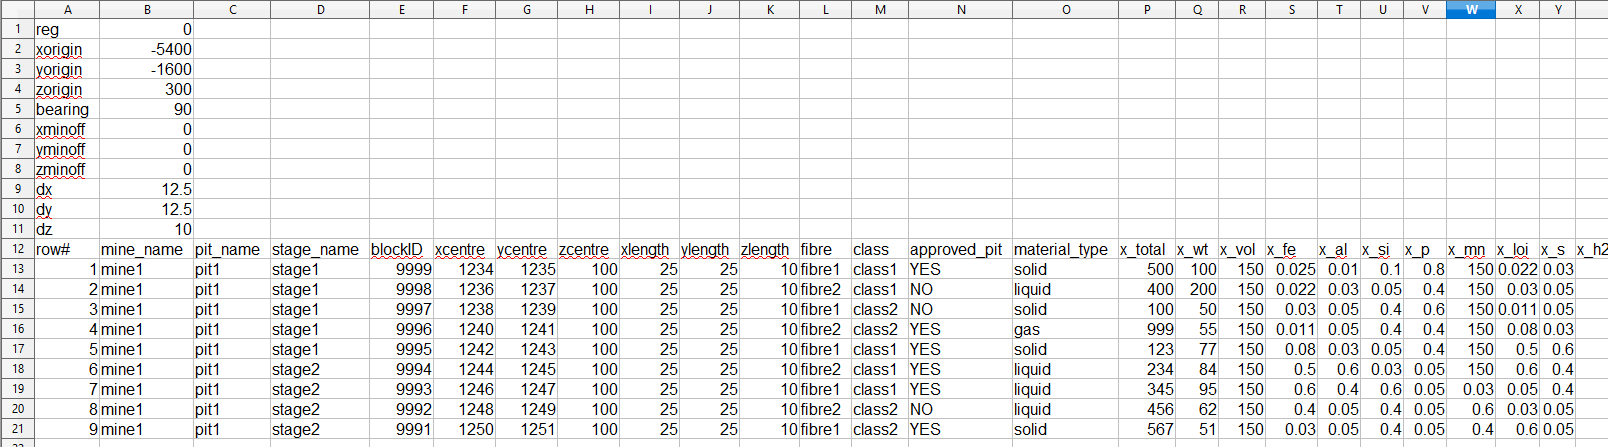
Example input.csv file
Headers
At the top of the input CSV the following global information must be provided:
- xorigin: The x coordinate of the system's origin;
- yorigin: The y coordinate of the system's origin;
- zorigin: The z coordinate of the system's origin;
- bearing: The site's bearing (in degrees, measured clockwise from north);
- xminoff: Minimum offset in the x direction;
- yminoff: Minimum offset in the y direction;
- zminoff: Minimum offset in the z direction;
- dx: Block size (x coordinate);
- dy: Block size (y coordinate); and
- dz: Block size (z coordinate).
Data
Below the headers is the data, arranged in columns with a header at the top.
Fields Setup CSV
The Fields Setup CSV tells the MPAS CSV Import Tool how your fields are labelled, and how they interact. The tool needs to know what to do with each and every column of the input table.
If you are importing multiple block models with different product headers (rprod1, rprod2, etc), list all possible headers from all block models - the importer will populate these with zeroes if they are not found in the block model.
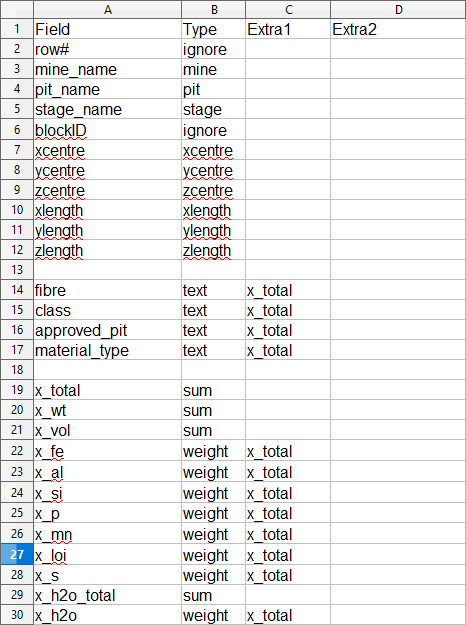
Example fields.csv setup file
Required Fields
- Mine: The input column header corresponding to the mine name (or equivalent).
- Pit: The input column header corresponding to the pit name (or equivalent).
- Stage: The input column header corresponding to the stage name (or equivalent).
Parcel: The input column header corresponding to the parcel name (or equivalent).
- XCentre: The input column header corresponding to the X position of the block.
- YCentre: The input column header corresponding to the Y position of the block.
- ZCentre: The input column header corresponding to the Z position of the block.
- XLength: The input column header corresponding to the dimensions of the block in the X direction.
- YLength: The input column header corresponding to the dimensions of the block in the Y direction.
- ZLength: The input column header corresponding to the dimensions of the block in the Z direction.
Other Field Types
Each column in your input table must appear in the Fields CSV, and be labelled as one of four types: Sum, Weight, Text, or Ignore, according to how you wish that they be treated when rows of the input table are merged into blocks in the model.
- Sum: Sum fields are columns containing a number, which are added upon merging rows. For example, the field labelled 'x_total' represents the total of some quantity, and so should be a Sum type field.
- Weight: Weight fields also correspond to columns containing a number, but they represent a proportion of a Sum field. For example, the field 'x_fe' might represent the proportion of Iron in quantity x, and so is a Weight field referring to the Sum field 'x_total'.
- Text: Text fields are columns with a text entry, usually corresponding to a categorisation of some kind. Their purpose is to keep track of these categories when combining rows in the input table. For example, the Text field 'class' in the example has a reference to 'x_total'. When combining rows, this field will separate the data according to the value of 'class' and keep track of all the subtotals.
- Ignore: Ignore fields are ignored by the importer. Use this if you don't care about some information (for example, above we have marked 'row#' as an Ignore field because it is of no use to us.
Notes:
- This should be a Comma Separated Value (CSV) file, with delimiter ','. Most spreadsheets can be output in this format by any of a number of freely or commercially available tools (eg Microsoft Excel, OpenOffice).
- It is okay to define unused fields: doing this will allow you to use one Fields Setup CSV for multiple input documents. The only important thing is to be sure the relationships between the fields are consistent, and that you define a field for every column in your input table.
Configuration XML Files
The MPAS Import Tool requires at least one configuration XML file, and supports the use of multiple files. The Configuration XML's job is to tell the import tool how to divide each parcel with respect to position.
Examples
Import all contents of the mine:
<AggConfig>
	<Stages>
		<Stage Name="Mine1">
			<Ranges>
				<Range StartZ="0"    DZ="5" SizeX="200"  SizeY="200"/>
				<Range StartZ="400"    DZ="10" SizeX="200"  SizeY="200"/>
			</Ranges>
		</Stage>
	</Stages>
</AggConfig>
Import all contents of pits:
Import individual stages:
Note the example takes the following form:
- The whole file is contained in an AggConfig tag;
- Within the AggConfig tag is a Stages section;
- In the Stages section, any number of Stage sections may be defined. Note: there must be at least one Stage section for each stage (i.e. Mine/Pit/Stage) in the input tables. If not, then the import tool will report and error and fail.
Each Stage section contains a set of Ranges. Each Range object defines the following parameters:
- StartZ - this is the minimum Z value (in real-world coordinates) defining this Range. Note that this Range object therefore has control over the system's behaviour for z greater than this value - unless there is a Range defined with a higher StartZ.
- DZ, SizeX, SizeY - The dimensions of a block within this Range. The parcel will be divided into blocks of dimensions (SizeX)x(SizeY)x(DZ) for the values on which this Range object applies.
For example, in the first example, blocks will be cut in 5 meter benches below the 400 RL, and in 10m benches above the 400 RL.