Blocks Exercises
The following exercises focus on managing blocks, connecting them to the network and applying on-bench travel rules.
Blocks Panel
The blocks panel is where blocks can be selected, hidden, and centred in the viewport.
To use the blocks panel:
- Open SampleModelWithBlocks.hinf from the sample data folder.
- Select "show blocks" from the top button menu.
- Open the Blocks panel in the bottom left of the Network tab.
- Expand the block tree.
- When you click on a row in the tree, that row should be temporarily visible in the viewport.
- When you tick a row in the tree, that row should be permanently visible in the viewport.
- When you double click a row, it should centre those blocks in the viewport.
- Check all blocks with the green double-tick icon.
- Uncheck all blocks with the grey double-tick icon.
- Change the tree order with the blue arrow icons.
- Remove a row with the single red minus icon. (This cannot be undone!)
- Remove all blocks with the double red minus icon. (This cannot be undone!)
- Press the cog icon to open the Setup Blocks menu.
- Enter different values for the travel level, travel alignment, and block type.
- Press okay to accept.
Block Joins
The distance traveled between a block and the network is called the "auto-join". Blocks automatically connect to the network at the same elevation within the auto-join distance of the bench. Users can then deselect auto-joins as required, or add their own manual joins.
Bench Level Pathfinding
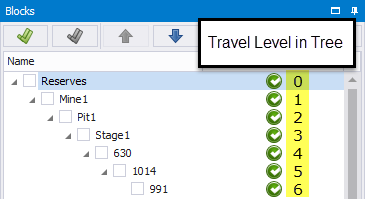
When you import blocks into Haul Infinity, you will be asked to set a Travel Level in Tree for each root record. The travel level needs to be set to the bench level.
Haul Infinity will create a network of centroids of the blocks to pathfind to the nearest ramp exit/entry point.
Blocks automatically connect to to the network at the same elevation within the auto join distance of the bench. If the user wants to limit what connections are taken, then they must edit the bench connections manually.
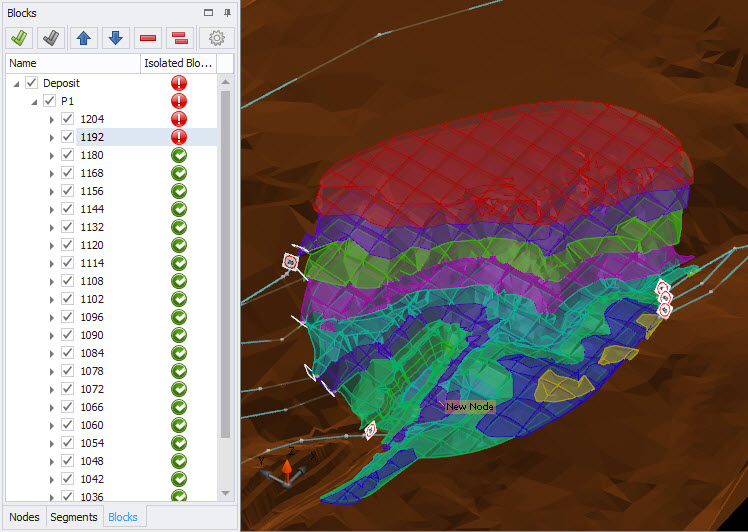
Isolated Blocks
After schedule blocks have been imported, go to the Blocks panel to check if they are all connected to the haul network. A red exclamation mark will show beside isolated blocks.
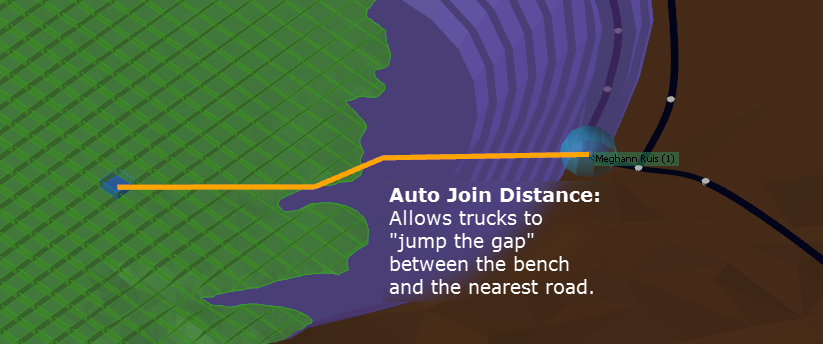
Auto Join Distance
Blocks may connect to any road that passes within the auto-join distance of the bench. This allows trucks to "jump the gap" between the bench and a nearby road.
The auto join distance should be set as low as possible to reduce the number of shortcuts taken by trucks.
Editing Joins
Blocks will automatically connect to any road that passes within the auto-join distance of the bench. Users can then deselect auto-joins as required, or add their own manual joins.
To change the auto join distance:
- Open SampleModelWithBlocks.hinf
- Go to Blocks > Join Interaction Mode
- Go to the Blocks panel bottom left and select the 1204 bench.
- Click on a block. You should see a connection to the ramp.
- Go to Setup > Settings > Bench Settings and change the Auto Join Distance to 200. This means that blocks will be able to connect to any road that passes through their elevation with 200 metres.
- Press OK to accept. You should now see two connections to the network.
To select and deselect joins:
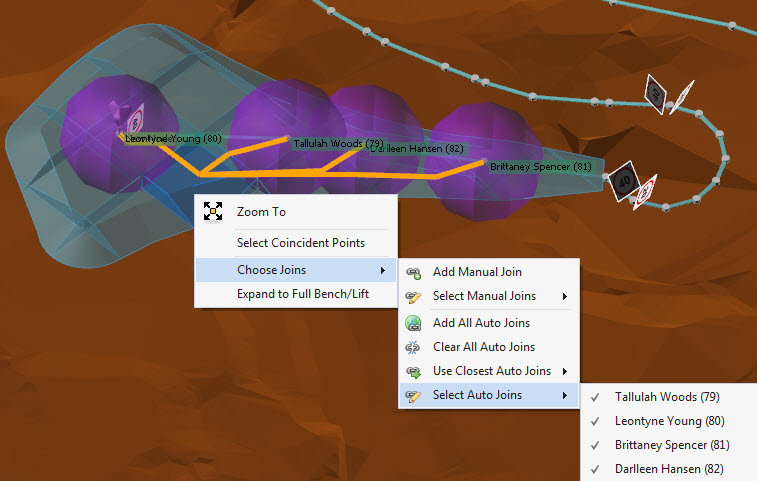
- To choose the closest join, right click on the block and select Choose Joins > Use Closest Auto Joins > Use Closest Join. This should deactivate the longer connection.
- To select and deselect auto joins, right click on the block and select Choose Joins > Select Auto Joins. This will open a list of the available joins, which you can activate or deactivate.
To create new joins:
- Right click on the block and select Choose Joins > Add Manual Join.
- Click a point on the network to connect to. A new join should appear.
- To remove a manual join right click on the block and select Choose Joins > Select manual join > deselect the manual join. The manual join should disappear.
- To restore the default joins, right click on the blocks and select Choose joins > Add All Auto Joins
Ramp Locking
Ramp Locking limits blocks from joining to any road that is not named to match their address in the block tree. This allows users to force benches, stages or mines to take certain ramps out of the pit.
- All blocks in Reserves may connect to a road named "Reserves".
- All blocks in Reserves\Mine1\Pit1 may connect to a road named "Reserves\Mine1\Pit1".
- All blocks in Reserves\Mine1\Pit1\Stage1\630 may connect to a road named "Reserves\Mine1\Pit1\Stage1\630"
The ramp locking script is calculated once and must be manually updated if you make changes to the network. It can be run from Tools > Extensions > Assign Joins Based on Segment Names Script.
To apply ramp locking:
- Open SampleModelWithBlocks.hinf
- Double click the ramp in the pit
- Go to the Properties panel and rename the ramp to "Deposit\P1"
- Double click the ramp to the dump
- Go to the Properties panel and rename the ramp to "Dumps"
- Go to Tools > Settings > Assign Joins Based On Segment Names
- Expand the Blocks menu in the bottom left of the screen
- The pit benches 1030 to 1120 should be green, and all the dump should be green.
You may have noticed that benches 1132 to 1204 did not connect to any ramps. This is because the roads that pass nearby to those benches still have arbitrary names. To make those roads generally accessible, try renaming them to "Deposit" and run the ramp locking script again.