Segments Exercises
These exercises illustrate the best practices for managing segments in a network.
Segment Naming
The Segments panel is where segments can be organised, zoomed, selected, hidden or edited.
To name segments in the network:
- Navigate to the sample data \NodesVersion folder.
- Open SampleModelWithNodes.hinf
- Centre all data in the viewport.
- Box select all roads in the network
- Go to the properties panel and rename the segments to "Surface"
- Box-select all roads in the pit
- Go to the properties panel and rename the segments to "Deposit\P1"
- Double-click the dump ramp
- Go to the properties panel and rename the segments to "Dumps"
Segment Groups
Grouping segments by name or data source can make it much easier to edit and interact with the network later on, especially if you have many interim pit ramps criss-crossing at different elevations.
Editing segments in groups:
- Go to the Segments panel and set the Grouped Fields to "Name"
- Use the tickboxes to toggle visibility on and off.
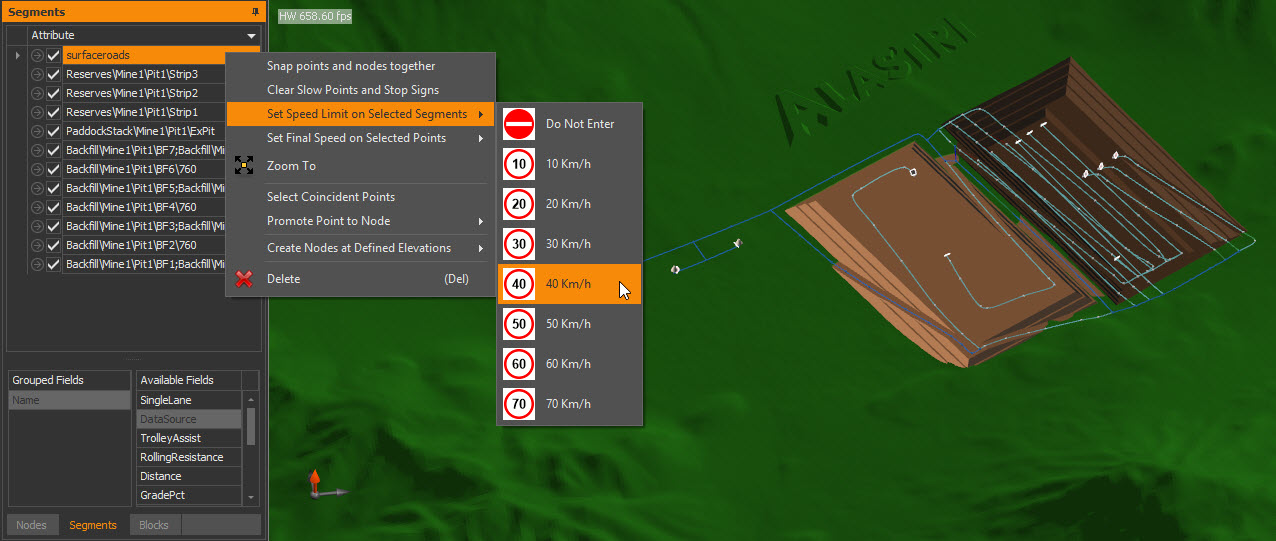
- Right Click > Zoom to centre the group in the viewport.
- Right Click > Select Coincident Points to select all nodes in the pit / in the dump.
- Right Click > Set Speed Limit to set speeds in the pit / on the dump.
Select the "Surface" group and change the in-pit rolling resistance in the properties panel.
The default rolling resistance is set in Tools > Project Settings > General.
Segment Flags
Flags are used to toggle road segments on or off. Flags can be referenced from your scheduling package to turn roads on and off according to a set of user-defined criteria. This may include staged ramp availability, seasonal calendar delays or restricted access periods. Using flags allows Haul Infinity to intelligently route trucks given a haul network which may be dynamic over time.
To turn off flagged segments:
- Open the Flags panel.
- Untick the flag.
This turns off any roads which have this flag in their properties.
To apply a flag to a segment:
- Click on the segment.
- Tick the flag in the properties panel.
When the flag is turned off, this segment will not be traversable.
To add a flag to a schedule (.csv) file:
- Navigate to the sample data \NodesVersion folder
- Open ScheduleWithNodes.csv
- At the first empty column, add a column header "Ramp1Access"
- Set values in the column to "OFF"
- Save and close the schedule
- Navigate to the sample data \NodesVersion folder.
- Open SampleModelWithNodes.hinf
- Go to the Schedule Auditor and click Import Schedule
- Map the fields to the column headers, including the "Ramp1Access" flag state.
- Click finish to continue.
When activating hauls through the schedule auditor, those hauls will correspond to the flag states in the schedule.
Gradient Tools
Haul Infinity has tools for drawing segments at a specified grade, and for applying grades to existing segments.
Gradient Draw Tool
To draw a ramp at ten percent grade:
- Select the draw tool

- Set the snap mode to triangles

- Set the Gradient tool to 10%

- While in plan view, draw a road over the surface terrain.
- Press escape to exit the draw tool.
- Turn off the Gradient tool by clicking on the "Gradient" text.
- Rotate the viewport to see the 10% ramp.
Use this tool to draw ramps when you don't have an existing design to snap to.
Tooltips & Offsets
When drawing an interim ramp up the side of a pit or dump, use the tooltips and offset dialog to get the best results.
Reading from tooltips:
- Activate mouseover tooltips

- Select the draw tool and set the snap mode to triangles.
- Find a spot at the toe of the dump and start drawing a ramp.
- Hover the mouse over the next bench level to see the distance, bearing and gradient. Find a 10% gradient and continue the ramp.
Offset by coordinates:
- Find the next point on the ramp that is approximately 10% grade.
- Hold control and left click to open the coordinate menu.
- Change the gradient to exactly 10%.
- Round the distance to the nearest whole number.
- Press okay to continue.
Apply Gradient Between Points
To apply a gradient between points:
- Hold control to select two points on the same road.
- Right click > Apply Gradient Between Points
- Set the gradient for all segments between the two points.
Vertical Offset Tool
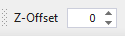
The z-offset tool can be used to draw elevated roads such as a skyway or overpass.
Draw segments with vertical offset:
- Set snap mode to triangles.
- Select the draw tool.
- Change the Z-offset to 10 metres
- Draw road over the topo surface.
- Press escape to exit the draw tool.
- Turn off the z-offset tool by clicking on the "Z-Offset" text.
Move a Point
To move a point:
- Double click a point on the network.
- Right click > Move Point
- Click where you want to move the point
Points can also be moved with the keyboard shortcut F.
Insert a Point
To insert a point:
- Left click a segment on the network
- Right click > Split Segment Here
To insert points at a distance from another point:
- Select a point on the network
- Right click > Split segments within X metres of this point
- Enter a distance, such as 10 metres
Tooltips
When drawing a road, the tooltips will show the coordinates, distance, bearing and gradient of the point being drawn. This can be used to draw ramps at the correct grade over topo or designs.
To enable tooltips, press or the Space bar on the keyboard.
Coordinate Menu
When drawing roads, the coordinates menu accepts absolute coordinates, relative offsets and polar offsets.
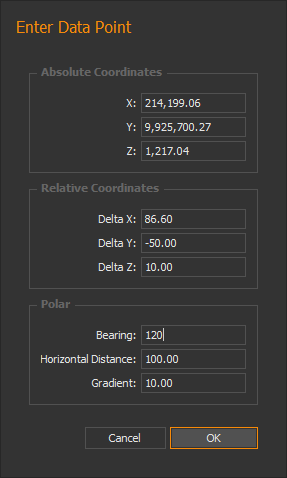
To open the coordinate menu:
- Press keyboard shortcut (D) to begin drawing.
- Draw a point on the network.
- Hold control and click to draw a new point.
- The coordinate menu will open with the coordinates of the clicked point.